NHẤP VÀO ĐÂY để xem các bước trước đó ....
Step 16
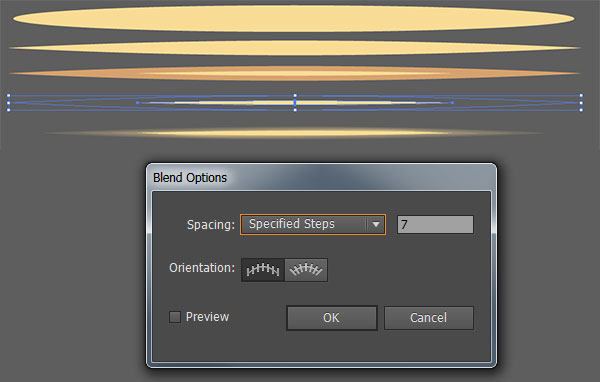
For additional highlight and shadow paths, we’re going to create two custom art brushes. The process for each is the same for each, with the difference between the two being their color only (one is a creamy yellow and the other is brown).
Use the Ellipse Tool (L) to draw a long, thin ellipse. Use the Convert Anchor Point Tool (Shift-C) to bring the two anchor points on either end of the ellipse to points. Select your new shape and go to Object > Path > Offset Path…. Offset the shape by -8px or so (hit preview so you can check out the offset shape) and hit OK. Select the larger of the two shapes and reduce its opacity to 0%. Select both shapes, and with the Blend Tool, create a smooth blend of 6-10 steps.
Step 17
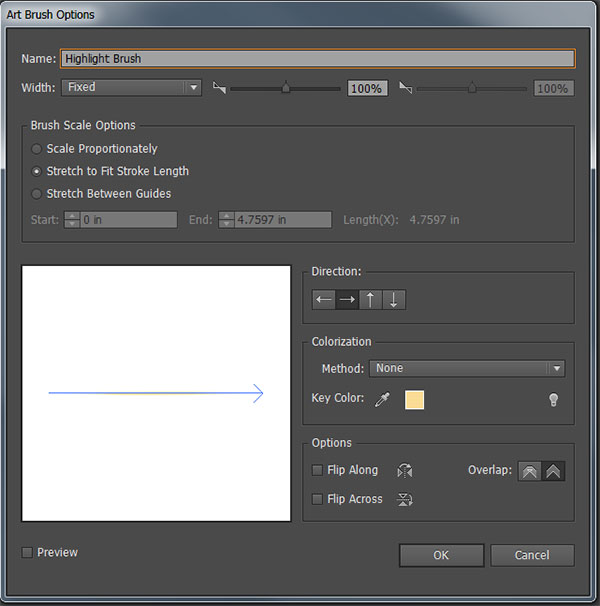
In order to create a brush with the blended shape you created in Step 16, go to the Brushes panel and hit New Brush. Select Art Brush and give it a name. I’ve left the settings at their default features (seen below). Make sure your brush’s direction is going to the left though. Hit OK, and you can use your new brush by selecting it in the Brushes panel with the Paintbrush Tool (B).
Step 18
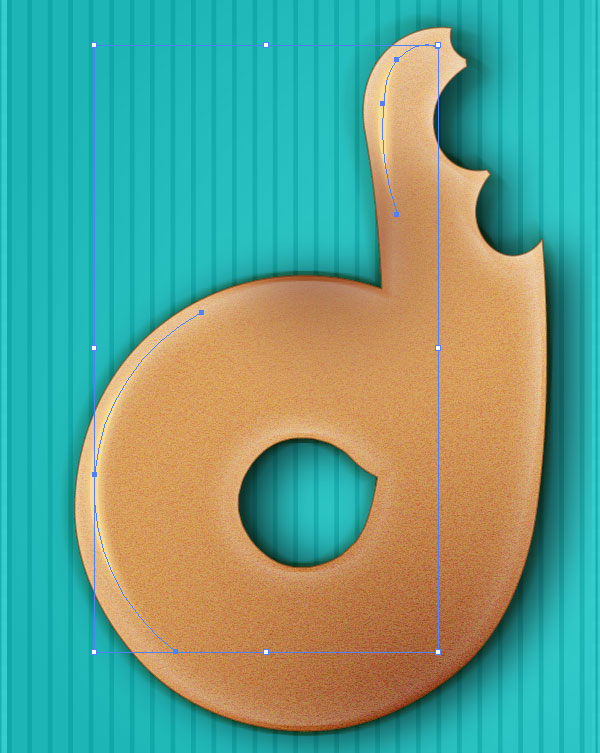
Use the brush made in Steps 16-17 to draw paths (with the Paintbrush Tool) along the left edges of your donut letter.
Step 19
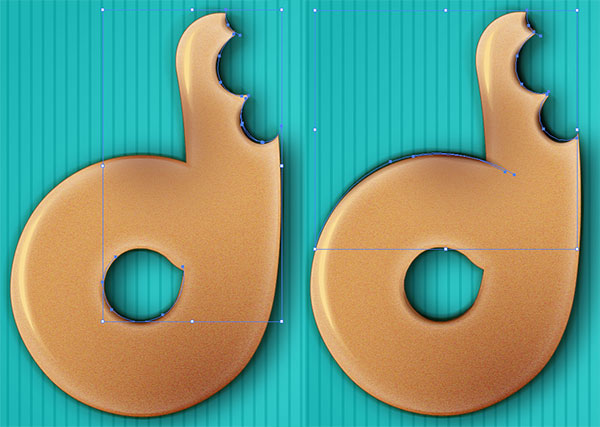
With the alternate brush (same as steps 16-17 but with brown instead of yellow), draw paths around the bottom edges, bite marks, and lower portion of the donut’s center. Group (Control-G) the paths together and set the group’s Blend Mode to Multiply. Group together all of the donut layers (those made in Steps 8-19).
Step 20
Unhide the icing shape in the Layers panel, and lock the donut D group so you don’t accidentally pick up paths or alter the appearance of its objects.

Step 21
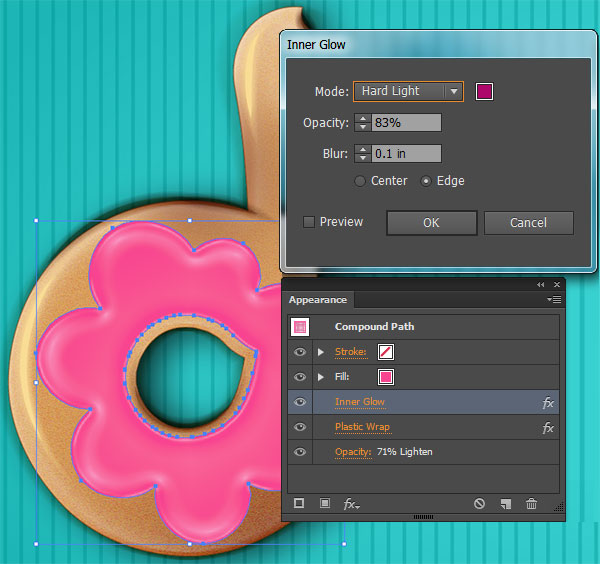
Copy and Paste the icing shape and align both icing pieces on the donut. If you’d like some of the donut to show through the center of the icing’s hole, you can enlarge the path around the hole by selecting it with the Direct Selection Tool (A) and resizing it with the Scale Tool (S) (hold down shift to keep the size ratio). In the Transparency panel, lower the icing shape’s Opacity to 71% and the Blend Mode to Lighten. Apply an Inner Gloweffect by going to Effect > Stylize > Inner Glow, with its Mode set to Hard Light, Opacity to 83%, and Blur to 0.1in.
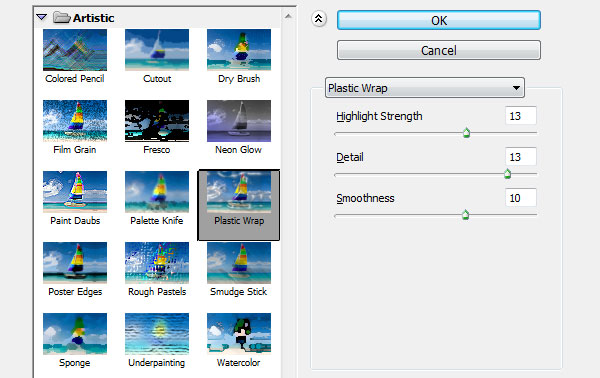
Additionally, apply the Artistic effect Plastic Wrap to this icing shape with the Highlight Strength at 13, Detail at 13, and Smoothness at 13. You may need to adjust these settings according to the icing’s overall shape (a bit of trial and error will be involved by editing effects in the Appearancepanel).
Step 22
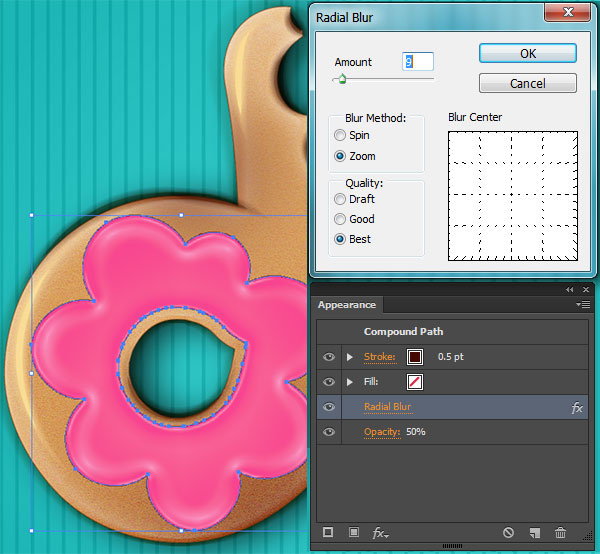
Copy and Paste the icing shape again. Set the Fill color to Null and the Stroke color to Brown at 0.5 pt weight. Apply a Radial Blur with the following settings: Amount is 9, Blur Method is Zoom, and Quality is Best.
Step 23
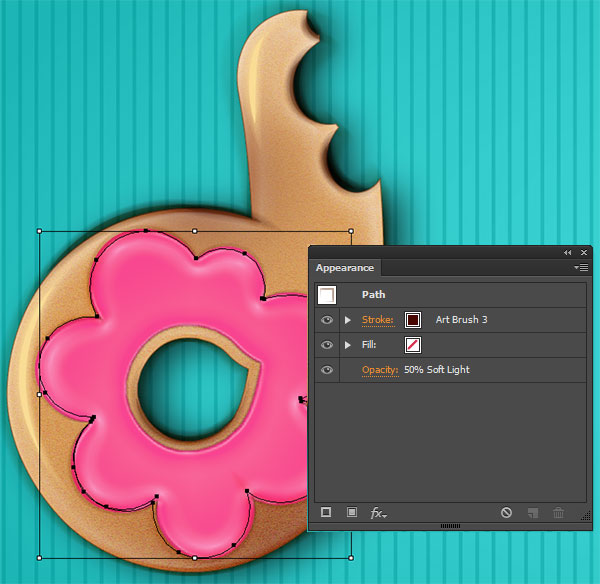
Paste the icing shape again and set the Fill color to Null, Stroke Color to Brown, Stroke Weight to 3pt, and apply the custom art brush created inSteps 16-17. Lower the Opacity to 50% and set the Blending Mode to Soft Light in the Transparency panel.
Step 24
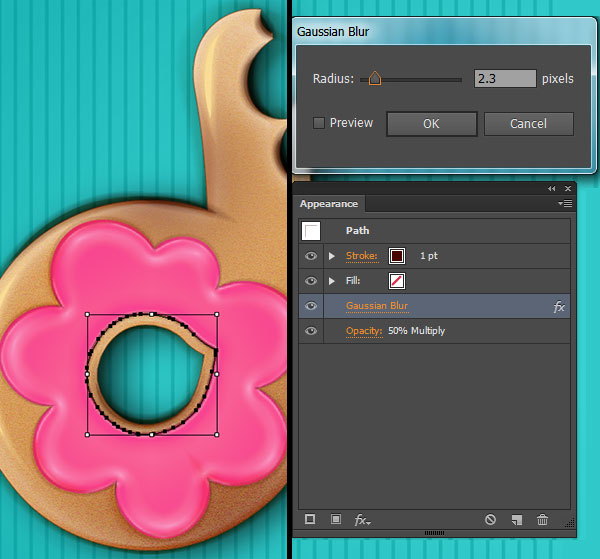
Copy and Paste the interior path of the icing shape. Set the Fill color to Null, Stroke Color to Brown, Stroke Weight to 1pt, Opacity to 50%, Blending Mode to Multiply, and apply a Gaussian Blur with a Radius of 2.3 Pixels. Group together the icing components created in Steps 20-24.
Step 25
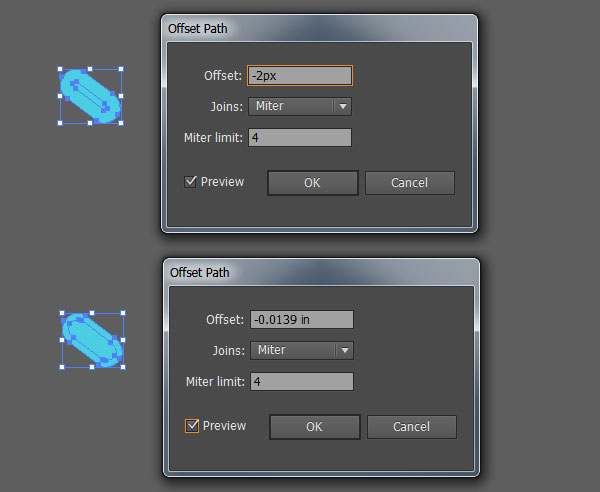
Draw a small shape with the Rounded Rectangle Tool. Offset the object’s path to -1px, hit OK, and select the first rounded rectangle again andOffset its path to -2px. Select each shape and apply a different shade of the same color to it. Group these three shapes together.
Step 26
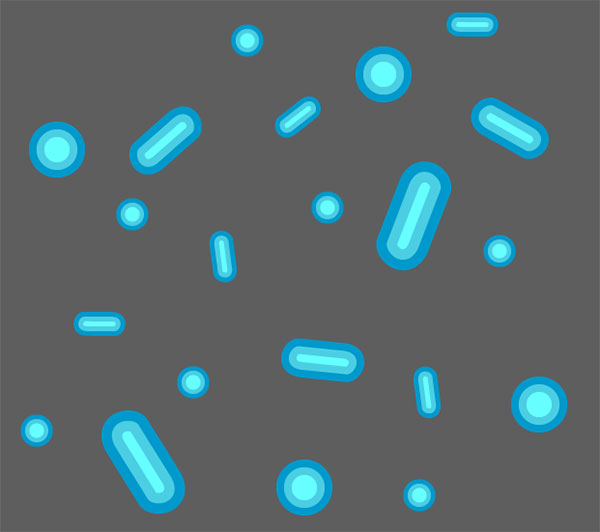
Repeat Step 25 on a circle. Copy, Paste, and Scale these sprinkles so you have an assortment of them in various sizes and angles.
Step 27
Select one of the sprinkle groups and go to Edit > Edit Colors > Recolor Artwork…
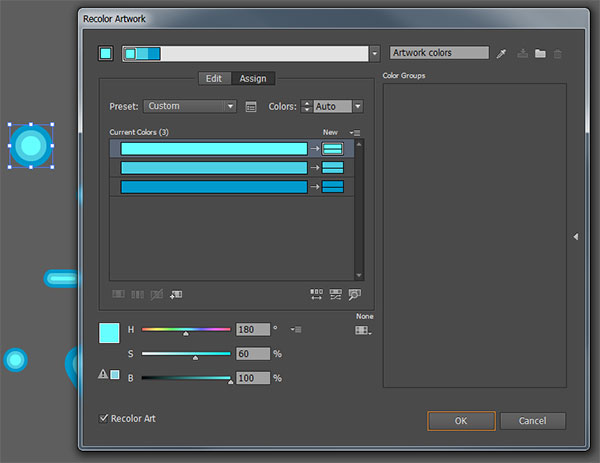
Double click one of the boxes under New to change its color. If you already have your chosen colors set in your Swatches panel, you can make easy work of recoloring the sprinkles by choosing the appropriate swatch. If not, stick to Color Models and choose from the Color Picker.
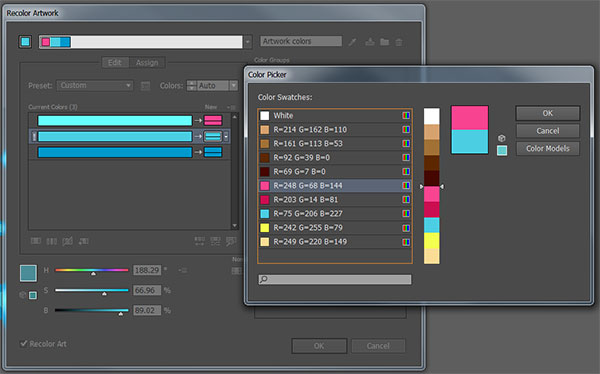
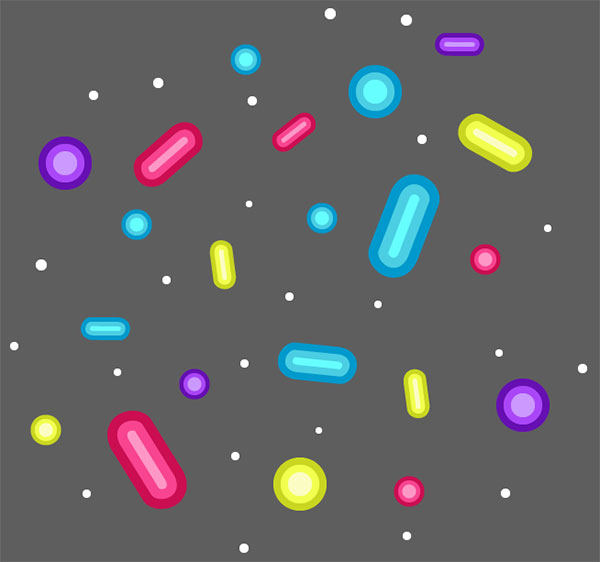
Change the colors for as many sprinkles as you’d like. Additionally, use the Ellipse Tool to draw small white circles for tiny sprinkles.
Step 28
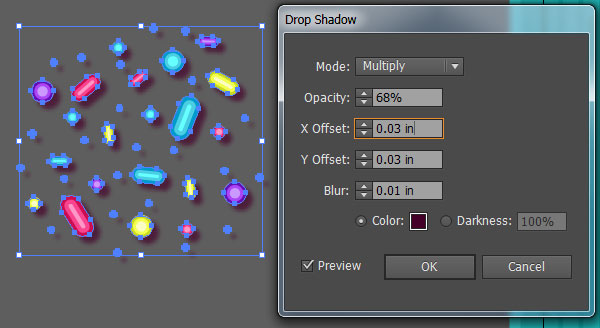
Select all of the sprinkles you’ve drawn and apply a Drop Shadow effect as follows: Mode set to Multiply, Opacity at 68%, X Offset is 0.03 in, Y Offset is 0.03 in, Blur is 0.01 in, and the Color is a dark magenta (since it’ll be on top of pink icing in my text). distribute the sprinkles around the icing as you see fit. Group the sprinkles together.
Step 29
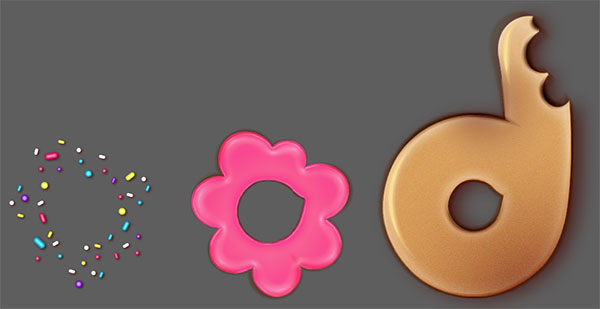
Here’s a view of the donut’s components: Cake, Icing, and Sprinkles. The Cake is covered in Steps 4-6 and Steps 9-19. The Icing is covered in Steps 7-8 and Steps 20-24. The Sprinkles are covered in Steps 25-28. Repeat each of these sections and their series of steps for each letter in your design.
Step 30
Make sure you Group each letter’s components together so your Layers panel is organized. Feel free to step up your design with various colors of icing, different donut flavors and a variety of donut styles. Bon appetite!

Nếu bạn có nhu cầu học khóa học Adobe illustrator (Ai) vui lòng NHẤP VÀO ĐÂY để xem chi tiết về khóa học hoặc NHẤP VÀO ĐÂY để gửi thắc mắc về khóa học của bạn cho chúng tôi.
Những bài viết có nội dung liên quan khác:
Phím tắt trong phần mềm Illustrator (AI)
Giáo trình illustrator cs6 tiếng việt
Hệ thống bài học Adobe illustrator (Ai) (tiếng Việt) có hướng dẫn chi tiết - Bài 1
Hệ thống bài học Adobe illustrator (Ai) có hướng dẫn chi tiết - Bài 1 (Phiên bản gốc)
Hệ thống bài học Adobe illustrator (Ai) có hướng dẫn chi tiết - Bài 2 (Phiên bản gốc)
Hệ thống bài học Adobe illustrator (Ai) có hướng dẫn chi tiết - Bài 3 (Phiên bản gốc)
Hệ thống bài học Adobe illustrator (Ai) có hướng dẫn chi tiết - Bài 4 (Phiên bản gốc)
Hệ thống bài học Adobe illustrator (Ai) có hướng dẫn chi tiết - Bài 5 (Phiên bản gốc)
Hệ thống bài học Adobe illustrator (Ai) có hướng dẫn chi tiết - Bài 6 (Phiên bản gốc) Phần 1
Hệ thống bài học Adobe illustrator (Ai) có hướng dẫn chi tiết - Bài 6 (Phiên bản gốc) Phần 2
Hệ thống bài học Adobe illustrator (Ai) có hướng dẫn chi tiết - Bài 7 (Phiên bản gốc)
Hệ thống bài học Adobe illustrator (Ai) có hướng dẫn chi tiết - Bài 8 (Phiên bản gốc)
Hệ thống bài học Adobe illustrator (Ai) có hướng dẫn chi tiết - Bài 9 (Phiên bản gốc)
Hệ thống bài học Adobe illustrator (Ai) có hướng dẫn chi tiết - Bài 10 (Phiên bản gốc) Phần 1
Hệ thống bài học Adobe illustrator (Ai) có hướng dẫn chi tiết - Bài 10 (Phiên bản gốc) Phần 2
Hệ thống bài học Adobe illustrator (Ai) có hướng dẫn chi tiết - Bài 11 (Phiên bản gốc)
Hệ thống bài học Adobe illustrator (Ai) có hướng dẫn chi tiết - Bài 12 (Phiên bản gốc) Phần 1
Hệ thống bài học Adobe illustrator (Ai) có hướng dẫn chi tiết - Bài 13 (Phiên bản gốc) Phần 1
Trung tâm TIN HỌC KEY
ĐC : 203-205 Lê Trọng Tấn – Sơn Kỳ - Tân Phú – TPHCM
ĐT : (028) 22 152 521
Web : key.com.vn
