Sweet and Sassy: How to Create Your Own Lollipop Vector
là một chương trình vẽ vector, thường được sử dụng để vẽ hình minh hoạ, hoạt hình, biểu đồ, đồ thị. Adobe Illustrator được dùng để thiết kế : như thiết kế những sản phẩm trong ngành thiết kế quảng cáo, thiết kế in ấn, thiết kế logo, thiết kế bản hiệu, thiết kế thời trang, thiết kế thiệp mời, Tạo các sản phẩm tờ rơi, Cataloge, Card Visit, Broucher, Profile,vẽ hoạt hình, tích hợp chuyển động cho Flash...Adobe Illustrator ưu diểm là dễ dàng thay đổi và trao đổi dữ liệu ,kích thước file nhẹ, dễ dàng tương thích với Photoshop, Corel Draw, và hỗ trợ in ấn rất tốt.
Hôm nay, trung tâm TIN HỌC KEY xin giới thiệu đến các bạn một hệ thống bài tập thực hành vẽ các đối tượng trong Adobe illustrator (Ai) (phiên bản tiếng anh, theo: vectips.com) có hướng dẫn chi tiết các bước thực hiện cụ thể để các bạn dễ dàng thực hành theo. Hôm nay chúng ta sẽ học bài 11: Sweet and Sassy: How to Create Your Own Lollipop Vector. Hy vọng hệ thống bài học này sẽ mang lại cho bạn những kiến thức hữu ích trong quá trình bạn học Adobe illustrator (Ai).
Chúc các bạn thành công!
Sweet and Sassy: How to Create Your Own Lollipop Vector
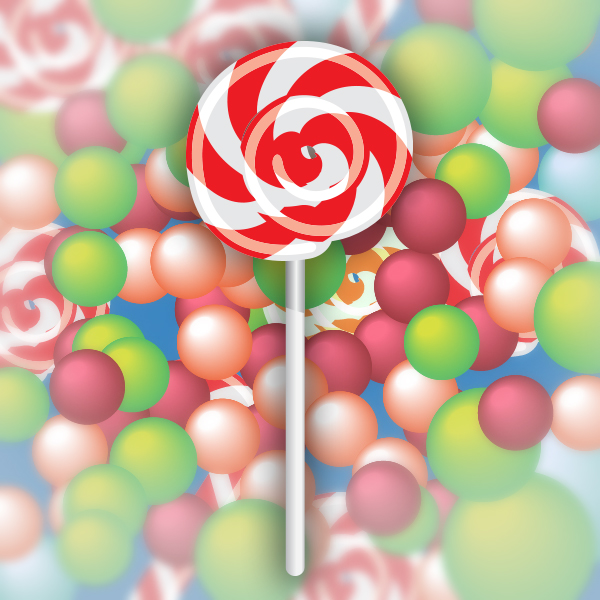
Final Image
Step 1
Create an artboard that is 800 x 600px. Select CMYK color mode, Screen (72ppi) and make sure that the “Align New Objects to Pixel Grid” box is unchecked before your click OK.
Step 2
Create a Rectangle with the Rectangle Tool (M). Set its size to width=540px and height 40px. Go to Effect -> Stylize -> Round Corners. Set theRadius to 20px. Fill it with a light gray color. Create a rectangle with the Rectangle Tool (M). Duplicate the rectangle: start dragging while pressing the Alt Key. Press Ctrl +D to repeat the previous step, …and again, until you have the right amount of rectangles. Select all of them and fill them with red.

Step 3
While the rectangles are still selected, go to Object -> Transform -> Shear, set the Shear Angle to 45°, then press OK. You can experiment with other angles, in this case check the Preview box to see the result. Now group the red objects together (Select all of them and press Ctrl + G), then place them over the rounded rectangle.

Step 4
Select the rounded rectangle, and place a copy to the Clipboard (Ctrl +C). You will need it later. Select the group and the rounded rectangle and intersect them (Window -> Pathfinder Panel -> Intersect) while pressing the Alt Key. On the Pathfinder Panel press Expand. Press Ctrl + B to paste the object from the Clipboard behind the red objects. You should see something like on the image below.

Step 5
Create a new rounded rectangle (w=510px / h=8px), fill it with white and place it over the other objects and set its Blending Mode (Window -> Transparency Panel) to Overlay. Select all objects and group them together. Now drag the group over the Window -> Brushes Panel.
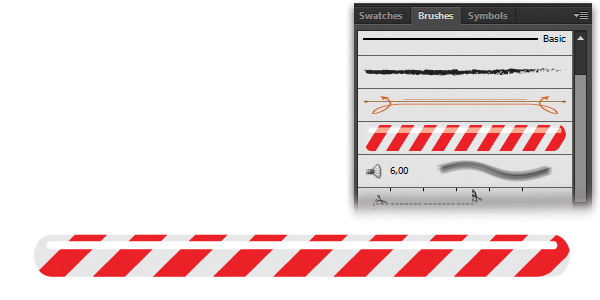
Step 6
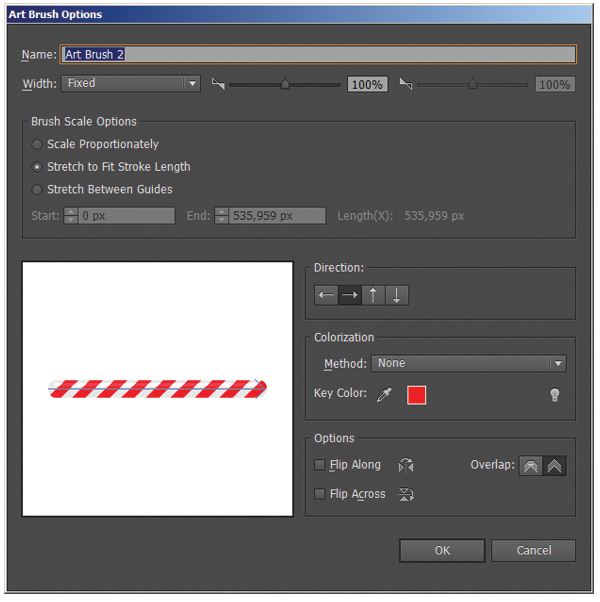
Select Art Brush as the new Brush type, press OK. On the Art Brush Options dialog you can set the new brush properties. In our case you can use the basic settings, so just Press the OK button.
Step 7
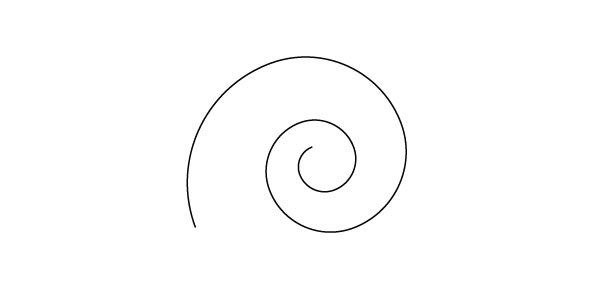
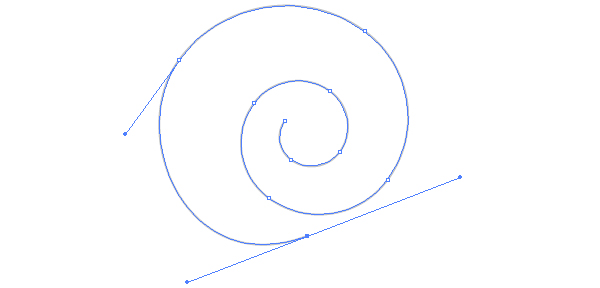
Create a Spiral with the Spiral Tool. While pressing the Left Mouse Button, you can rotate, resize, replace (by pressing the Space key) or even add or remove curls with the Up or Down Keys.
Step 8
With the Direct Selection Tool (A) grab the last anchor point and move it closer to the center of the spiral. Use the handles to get a rounded shape as you see on the image below.
Step 9
Select the brush you created previously from the Brushes Panel.

Step 10
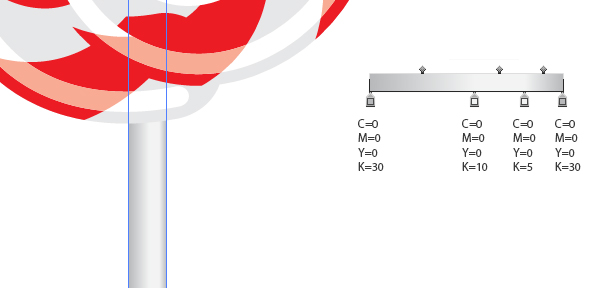
Create a rounded rectangle (w=15 /h=320px). Place it behind the spiral and fill it with a linear gradient of white and gray.
Step 11
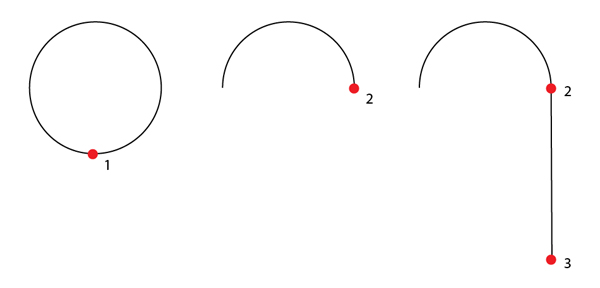
Remember, you can edit the curl of the spiral with the Direct Selection Tool (A) so you can create whatever shape you want. Or you can create a whole new candy with the same brush.
For example to create a Christmastime candy cane you just have to create a Circle with the Ellipse Tool (L). With the Direct Selection Tool (A) select the bottom anchor point (1) and delete it. Click with the Pen Tool (P) on the anchor point (2) and add another anchor point (3) to extend the arch with a line. You can edit later if you need a longer line. Now select the same brush you created earlier and you’re done!
Step 12
Here are the results of today’s work.

Nếu bạn có nhu cầu học khóa học Adobe illustrator (Ai) vui lòng NHẤP VÀO ĐÂY để xem chi tiết về khóa học hoặc NHẤP VÀO ĐÂY để gửi thắc mắc về khóa học của bạn cho chúng tôi.
Những bài viết có nội dung liên quan khác:
Phím tắt trong phần mềm Illustrator (AI)
Giáo trình illustrator cs6 tiếng việt
Hệ thống bài học Adobe illustrator (Ai) (tiếng Việt) có hướng dẫn chi tiết - Bài 1
Hệ thống bài học Adobe illustrator (Ai) có hướng dẫn chi tiết - Bài 1 (Phiên bản gốc)
Hệ thống bài học Adobe illustrator (Ai) có hướng dẫn chi tiết - Bài 2 (Phiên bản gốc)
Hệ thống bài học Adobe illustrator (Ai) có hướng dẫn chi tiết - Bài 3 (Phiên bản gốc)
Hệ thống bài học Adobe illustrator (Ai) có hướng dẫn chi tiết - Bài 4 (Phiên bản gốc)
Hệ thống bài học Adobe illustrator (Ai) có hướng dẫn chi tiết - Bài 5 (Phiên bản gốc)
Hệ thống bài học Adobe illustrator (Ai) có hướng dẫn chi tiết - Bài 6 (Phiên bản gốc) Phần 1
Hệ thống bài học Adobe illustrator (Ai) có hướng dẫn chi tiết - Bài 6 (Phiên bản gốc) Phần 2
Hệ thống bài học Adobe illustrator (Ai) có hướng dẫn chi tiết - Bài 7 (Phiên bản gốc)
Hệ thống bài học Adobe illustrator (Ai) có hướng dẫn chi tiết - Bài 8 (Phiên bản gốc)
Hệ thống bài học Adobe illustrator (Ai) có hướng dẫn chi tiết - Bài 9 (Phiên bản gốc)
Hệ thống bài học Adobe illustrator (Ai) có hướng dẫn chi tiết - Bài 10 (Phiên bản gốc) Phần 1
Hệ thống bài học Adobe illustrator (Ai) có hướng dẫn chi tiết - Bài 10 (Phiên bản gốc) Phần 2
Trung tâm TIN HỌC KEY
ĐC : 203-205 Lê Trọng Tấn – Sơn Kỳ - Tân Phú – TPHCM
ĐT : (028) 22 152 521
Web : key.com.vn
Địa chỉ: 203 - 205 Lê Trọng Tấn, P. Sơn Kỳ, Q. Tân Phú, TP. HCM.
Điện thoại: (028) 22 152 521
Website: key.com.vn - Email: key@key.com.vn
Địa chỉ: 765-767A (Số mới: 558-560A) Nguyễn Ảnh Thủ, P. Tân Chánh Hiệp, Q. 12, TP. HCM.
Điện thoại: (028) 2242 2244
Website: key.com.vn - Email: key@key.com.vn