NHẤP VÀO ĐÂY để xem các bước trước đó .......
Step 15
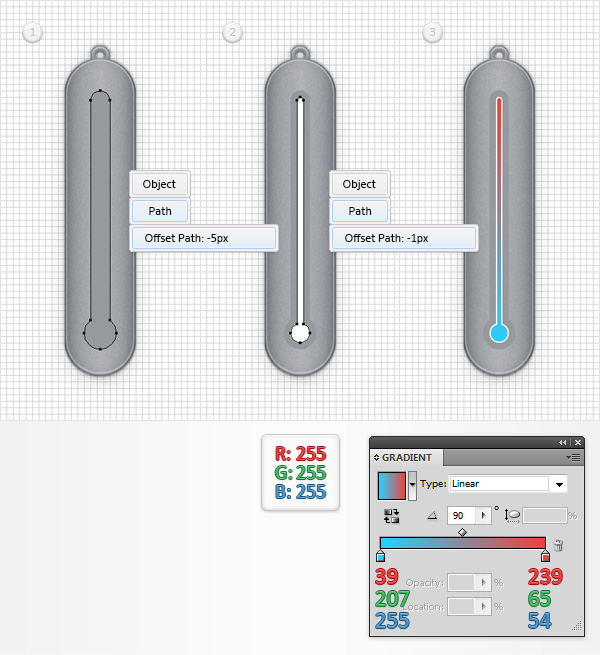
Reselect your "barFrame" shape and go to Object > Path > Offset Path. Enter a -5px offset and click OK. Fill the resulting shape with white then move to the Layers panel and name it "bar". Make sure that your "bar" is selected and go again to Object > Path > Offset Path. Enter a -1px offset and click OK. Fill the resulting shape with the linear gradient shown in the following image; then move to the Layers panel and name it "liquid".
Step 16
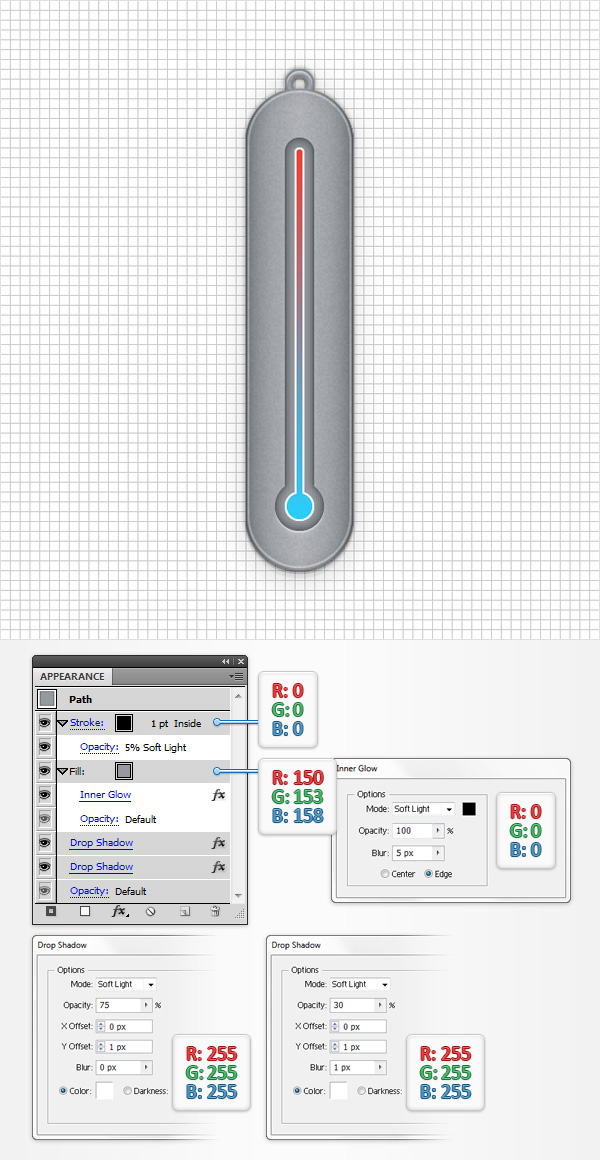
Reselect your "barFrame" shape, focus on the Appearance panel, select the existing fill and go to Effect > Stylize > Inner Glow. Enter the properties shown in the following image, click OK and return to the Appearance panel. Add a 1pt, black stroke, align it to inside, change the Blending Mode toSoft Light and lower its Opacity to 5%. Get back to the Appearance panel, make sure that the entire path is selected (simply click on the "Path" piece of text from the top of the Appearance panel) and go to Effect > Stylize > Drop Shadow. Enter the properties shown in the left window (in the following image), click OK and go again to Effect > Stylize > Drop Shadow. Enter the properties shown in the right window and click OK.
Step 17
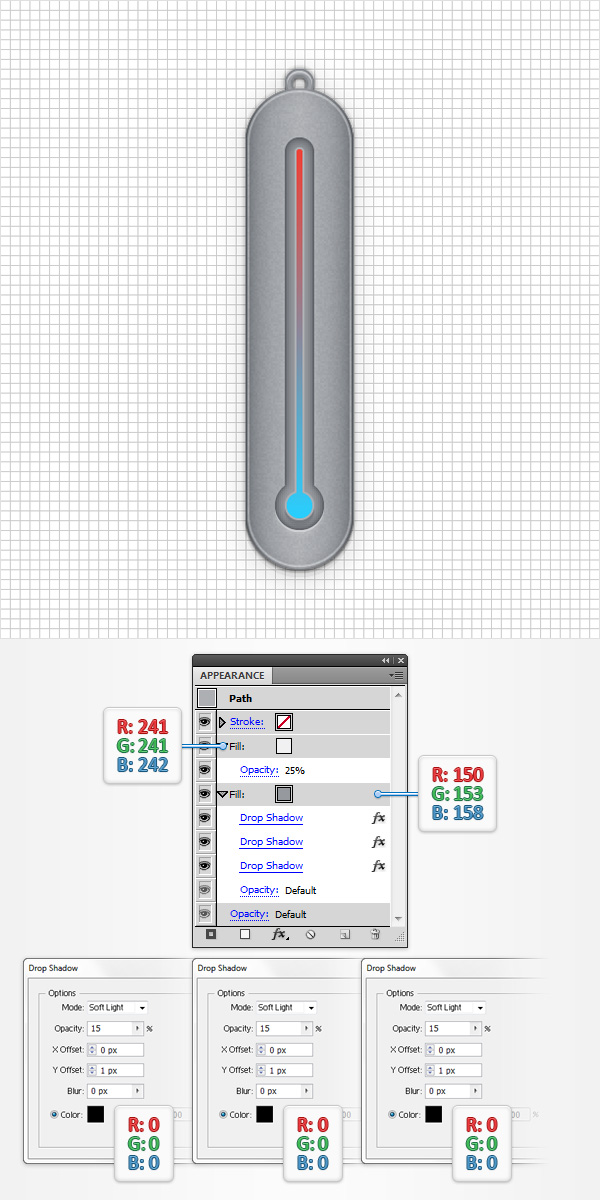
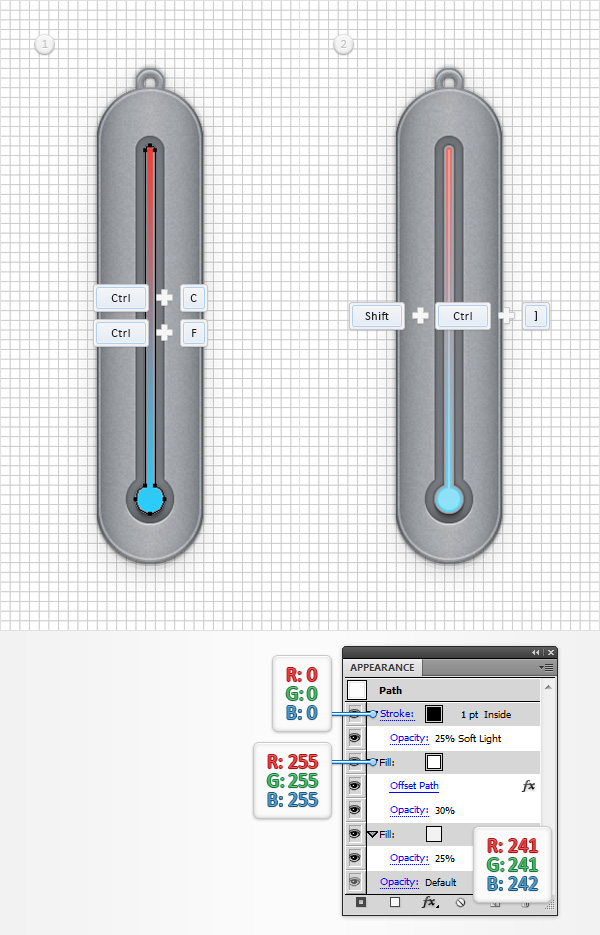
Reselect your "bar" shape, focus on the Appearance panel, select the existing fill and go to Effect > Stylize > Drop Shadow. Enter the properties shown in the left window (in the following image), click OK and go again to Effect > Stylize > Drop Shadow. Enter the properties shown in the middle window, click OK and go one more time to Effect > Stylize > Drop Shadow. Enter the properties shown in the right window, click OK and return to the Appearance panel. Add a second fill for this shape, select it, set the color at R=241 G=241 B=242 and lower its Opacity to 25%.
Step 18
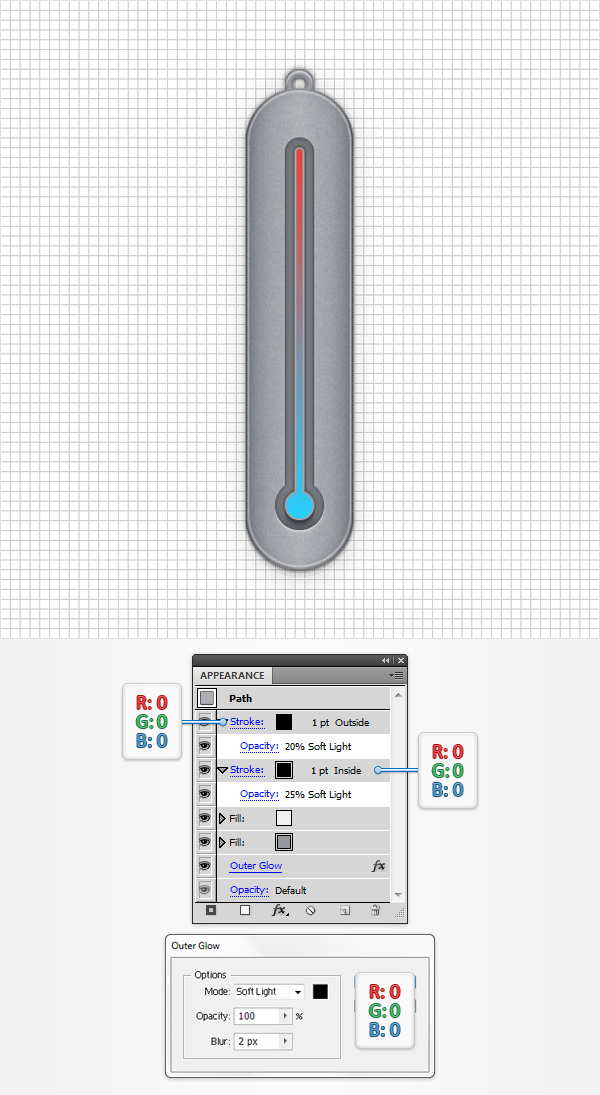
Make sure that your "bar" shape is still selected and focus on the Appearance panel. Add a 1pt stroke, set the color at black, align it to inside, change the Blending Mode to Soft Light and lower its Opacity to 25%. Return to the Appearance panel and add a second stroke for your "bar" shape. Make it 1pt wide, make sure that the color is set at black, align it to outside, change the Blending Mode to Soft Light and lower its Opacityto 20%. Get back to the Appearance panel, make sure that the entire path is selected and go to Effect > Stylize > Outer Glow. Enter the properties shown in the following image and click OK.
Step 19
Reselect your "bar" shape, make a copy in front (CTRL + C > CTRL + F) and bring it to front (Shift + CTRL + ] ). Move to the Layers panel and rename this new shape “barFront“. Make sure that your “barFront” shape stays selected and focus on the Appearance panel. First, simply hit the D button from your keyboard to easily get rid of the existing Appearance attributes. Now, select the white fill, lower its Opacity to 30% and go to Effect > Path > Offset Path. Enter a -2px offset and click OK. Return to the Appearance panel, add a second fill and drag it below the existing fill. Select the new fill, lower its Opacity to 25% and set the color at R=241 G=241 B=242. Get back to the Appearance panel, select the existing black stroke, align it to inside then lower its Opacity to 25% and change the Blending Mode to Soft Light.
Step 20
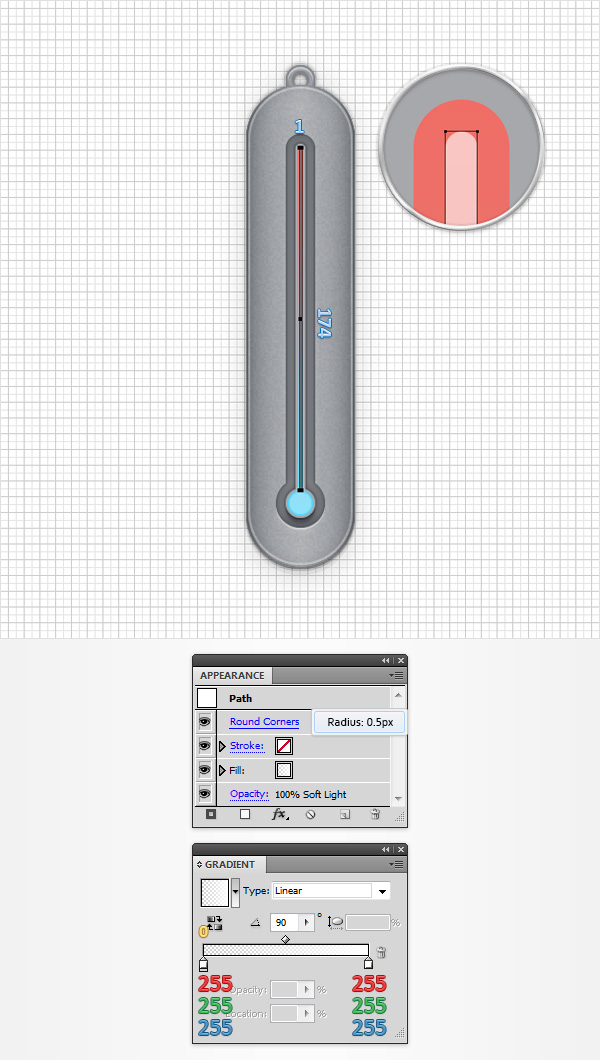
For the following step, you will need a grid every 1px, so go to Edit > Preferences > Guides & Grid and enter 1 in the Gridline every box. Using theRectangle Tool (M), create a 1 x 174px shape, fill it with the linear gradient shown below and place it as shown in the following image. The yellow zero from the Gradient image stands for Opacity percentage. This means that you need to select that gradient slider, focus on the Opacity box (from the Gradient panel) and drag it to 0%. Make sure that this thin rectangle is still selected, change its Blending Mode to Soft Light and go to Effect > Stylize > Rounded Corners. Enter a 0.5px radius and click OK.
Step 21
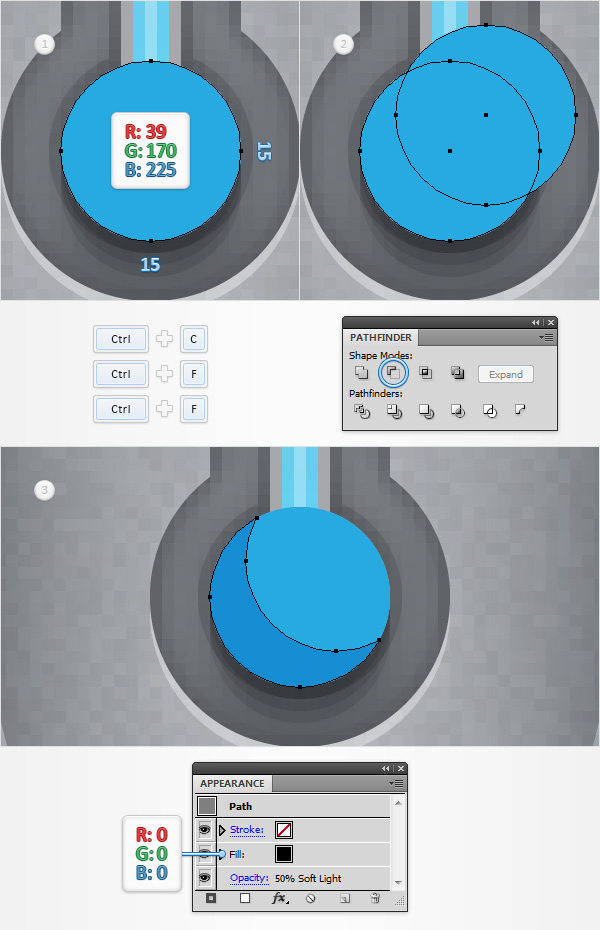
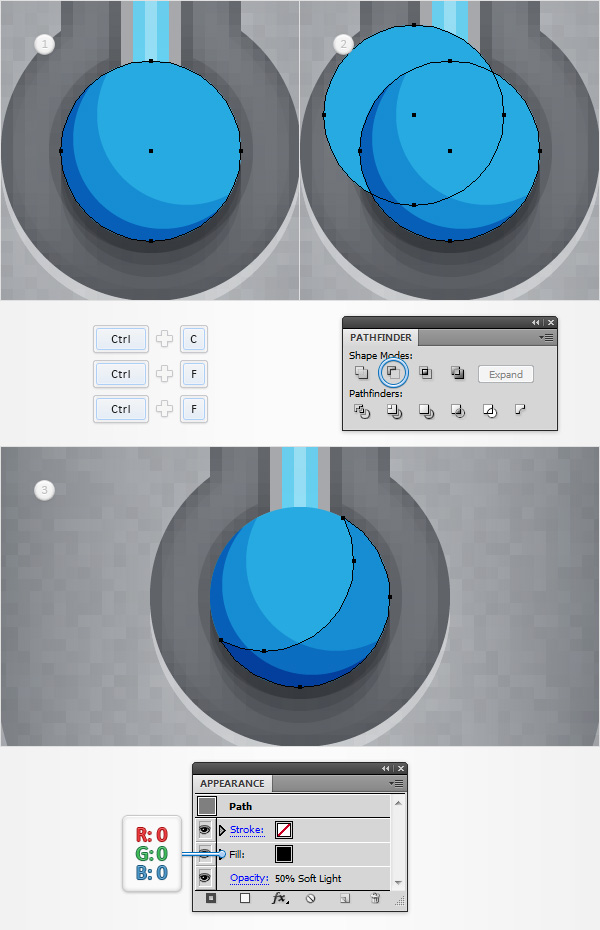
Using the Ellipse Tool (L), create a 15px circle, set the fill color at R=39 G=170 B=225 and place it as shown in the first image. Disable the Snap to Grid (View > Snap to Grid), then reselect your blue circle and make two copies in front (CTRL + C > CTRL + F > CTRL + F). Select the top copy and move it 3px up and 3px to the right using the up and right arrow buttons from your keyboard. Reselect both copies and click the Minus Frontbutton from the Pathfinder panel. Fill the resulting shape with black, lower its Opacity to 50% and change the Blending Mode to Soft Light.
Step 22
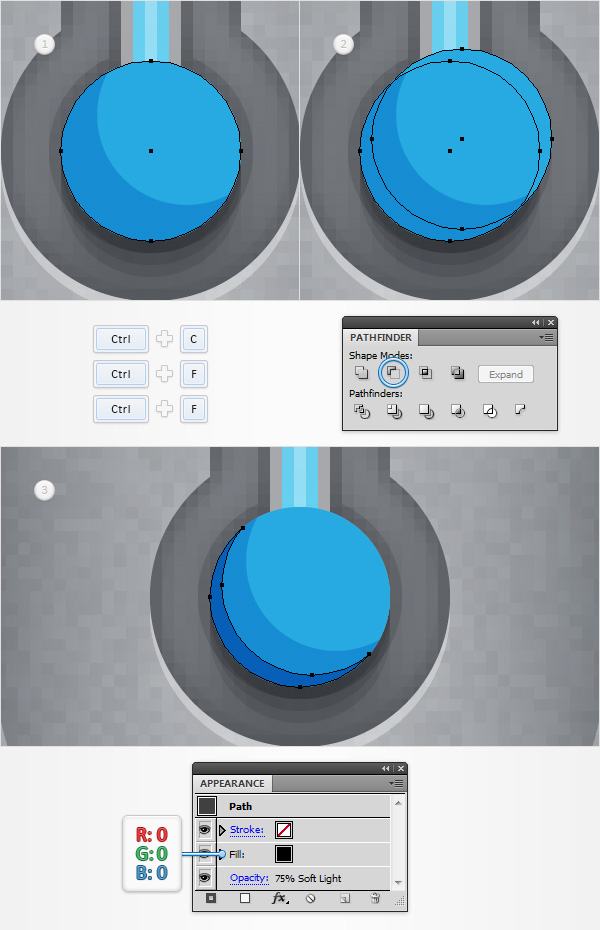
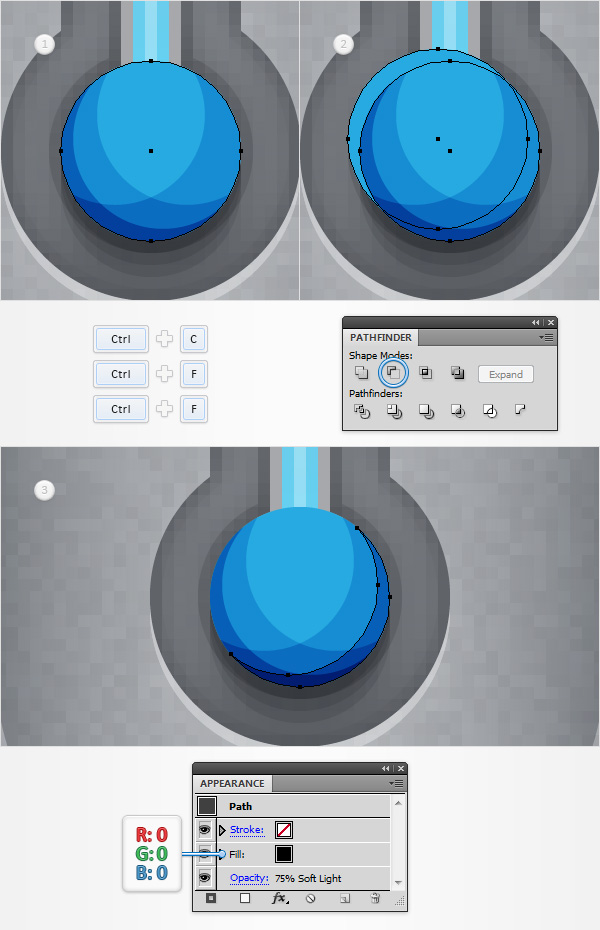
Reselect your blue circle and make two copies in front (CTRL + C > CTRL + F > CTRL + F). Select the top copy and move it 1px up and 1px to the right. Reselect both copies and click the Minus Front button from the Pathfinder panel. Fill the resulting shape with black, lower its Opacity to 75%and change the Blending Mode to Soft Light.
Step 23
Reselect your blue circle and make two copies in front (CTRL + C > CTRL + F > CTRL + F). Select the top copy and move it 3px up and 3px to the left. Reselect both copies and click the Minus Front button from the Pathfinder panel. Fill the resulting shape with black, lower its Opacity to 50% and change the Blending Mode to Soft Light.
Step 24
Reselect your blue circle and make two copies in front (CTRL + C > CTRL + F > CTRL + F). Select the top copy and move it 1px up and 1px to the left. Reselect both copies and click the Minus Front button from the Pathfinder panel. Fill the resulting shape with black, lower its Opacity to 75% and change the Blending Mode to Soft Light.
Step 25
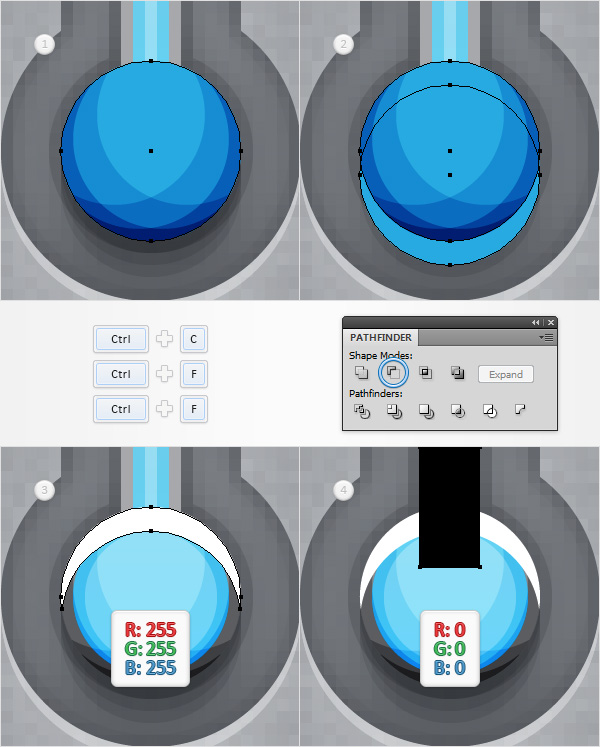
Reselect your blue circle and make two copies in front (CTRL + C > CTRL + F > CTRL + F). Select the top copy and move it 2px down using the down arrow button from your keyboard. Reselect both copies and click the Minus Front button from the Pathfinder panel. Fill the resulting shape with white. Grab the Rectangle Tool (M), create a 5 x 8px, black rectangle and place it as shown in the fourth image.
NHẤP VÀO ĐÂY để xem các bước tiếp theo ..........
Trung Tâm TIN HỌC KEY
ĐC: 203 -205 Lê Trọng Tấn - Sơn Kỳ - Tân Phú - TP HCM
ĐT: (028) 22 152 521
