là một chương trình vẽ vector, thường được sử dụng để vẽ hình minh hoạ, hoạt hình, biểu đồ, đồ thị. Adobe Illustrator được dùng để thiết kế : như thiết kế những sản phẩm trong ngành thiết kế quảng cáo, thiết kế in ấn, thiết kế logo, thiết kế bản hiệu, thiết kế thời trang, thiết kế thiệp mời, Tạo các sản phẩm tờ rơi, Cataloge, Card Visit, Broucher, Profile,vẽ hoạt hình, tích hợp chuyển động cho Flash...Adobe Illustrator ưu diểm là dễ dàng thay đổi và trao đổi dữ liệu ,kích thước file nhẹ, dễ dàng tương thích với Photoshop, Corel Draw, và hỗ trợ in ấn rất tốt.
Hôm nay, trung tâm TIN HỌC KEY xin giới thiệu đến các bạn một hệ thống bài tập thực hành vẽ các đối tượng trong Adobe illustrator (Ai) (phiên bản tiếng anh, theo: vectips.com) có hướng dẫn chi tiết các bước thực hiện cụ thể để các bạn dễ dàng thực hành theo. Hôm nay chúng ta sẽ học bài 7: Handmade With Love! How to Create Vintage Badge Vectors. Hy vọng hệ thống bài học này sẽ mang lại cho bạn những kiến thức hữu ích trong quá trình bạn học Adobe illustrator (Ai).
Chúc các bạn thành công!
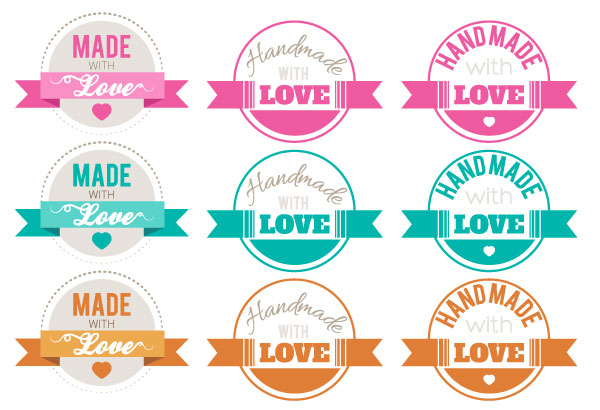
Handmade With Love! How to Create Vintage Badge Vectors
Final Image

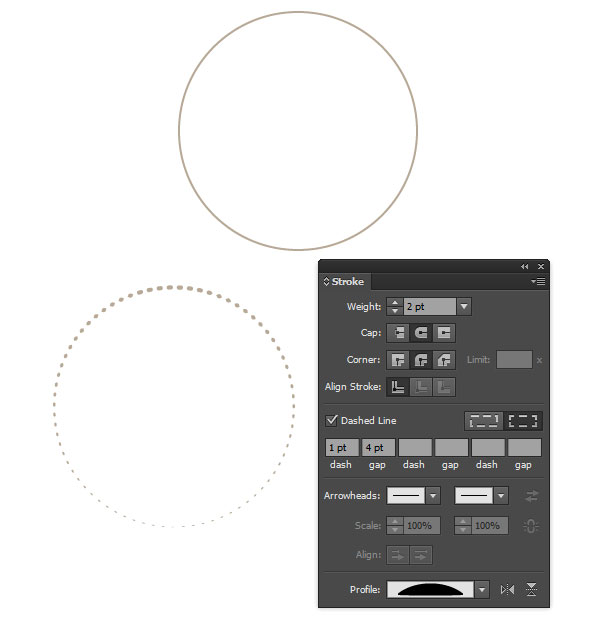
Step 1
Let’s start with a circle. Draw one out using the Ellipse Tool (L). Keep the fill color set to Null and the stroke color set to a dark, warm gray. In theStroke panel, set the weight to 2pts, Cap to Rounded, Corner to Rounded, Dash to 1pt, and the Gap to 4pts. Finally, to get the faded look seen below, set the Profile to Width Profile 6.
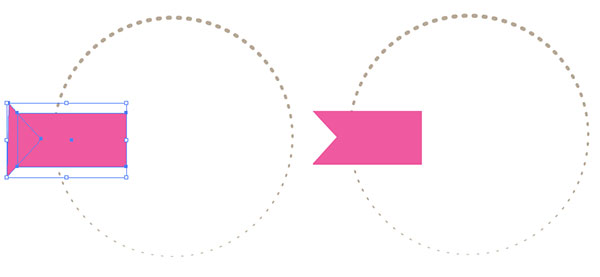
Step 2
In order to create the banner for these vintage badge vectors, you’ll need to draw a narrow rectangle with the Rectangle Tool (M). The color is up to you. For this vintage badge vector set, I’ve chosen pink. You’ll need three shades of this color at the ready for the design set (choose with the Colorpanel and save in the Swatches panel). Draw a Triangle either with the Pen Tool (P) or the Polygon Tool (set sides to 3) and place at one end of the rectangle. You’ll want the triangle’s side angles to line up with the rectangle’s corners. Select both and hit Minus Front in the Pathfinder panel.Copy (Control-C) and Paste (Control-V) this banner half and Reflect it over a Vertical Axis so you can place it on the other side.
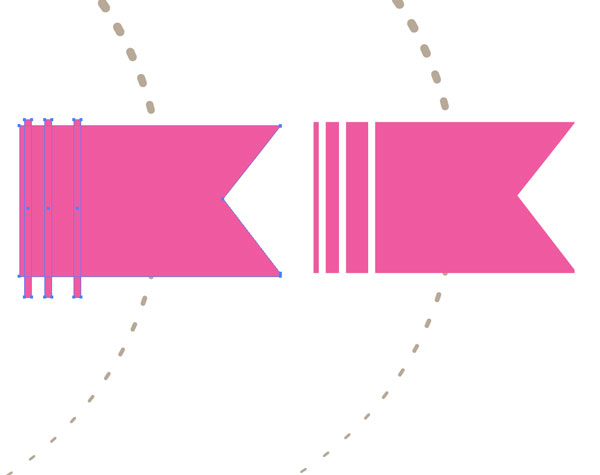
Step 3
These vintage badge vector designs contain two banner types. This is the second shown in the final image. Draw three narrow vertical rectangles and space them varying widths apart. Unite them in the Pathfinder panel. Select both the newly compounded rectangles and the banner half drawn in the previous step, and hit Minus Front in Pathfinder. Repeat this step on the other side, or just Copy, Paste, and Reflect.
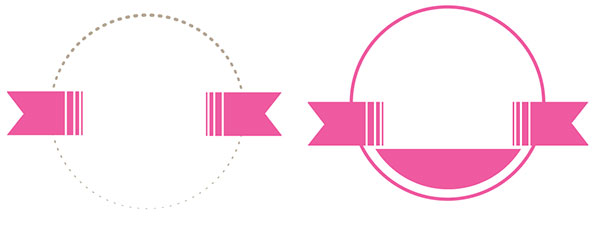
Step 4
This vintage badge vector style has a half-circle at the bottom of it. Draw a full circle with the Ellipse Tool within the larger circle (the stroke was changed from a dashed line to a solid line in the Stroke panel). Draw a large rectangle over 2/3 of the smaller circle and hit Minus Front in thePathfinder panel. Optionally, you can hit Divide in the Pathfinder panel if you want to use the top portion for something else. This design should be left with only the bottom portion of the circle.

Step 5
This is a shot of the two stroke styles used in the vintage badge vectors in this tutorial. The next step deals with completing the first banner ribbon style (which doesn’t actually require the process from Step 3.
Step 6
Draw a long retangle that has the same width as the other banner pieces. Offset it by moving it upwards on the picture plane. Using the Pen Tooldraw a small triangle that will connect the large rectangle’s cormer to the banner ribbon’s tail pieces (you’ll need two of them). Change the large rectangle’s color to a lighter hue than the tail pieces of the banner. Change the little triangles (which should be places beneath the large rectangle in the Layers panel) to a darker hue than the colors of the tail pieces. Group (Control-G) these components together.
Step 7
Time for the text! Write out the banner text with the Type Tool (T). Choose a thick, script font that you enjoy. In this case, I chose Ballpark Weiner.Expand the text under Object so your type becomes grouped shapes. To create the flourishes on the text, use the Pencil Tool (N) to draw squiggles and loops coming off of the L and the E.

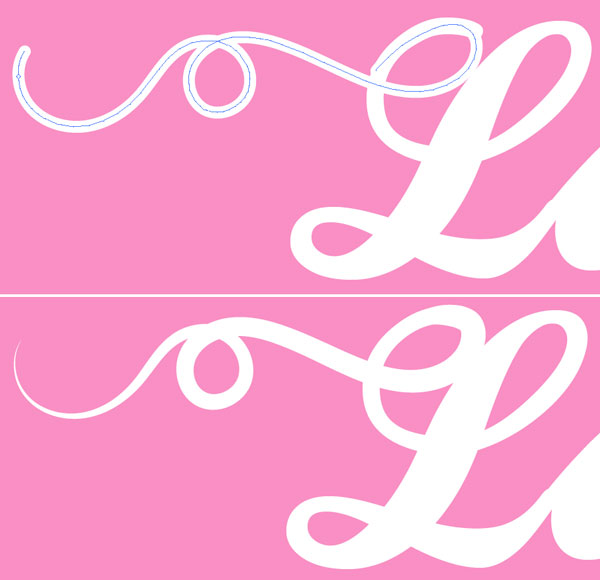
Step 8
In order to make the flourishes come off of the letters more organically, use the Direct Selection Tool (A) to manipulate the anchor points of the path so they’re lined up with the text. You may need to use the Delete Anchor Point Tool (-) or the Add Anchor Point Tool (+) in order to get the line completely within the letters’ outlines. To taper the flourish’s path off, use the Width Tool (Shift-W) on the end anchor point.
Step 9
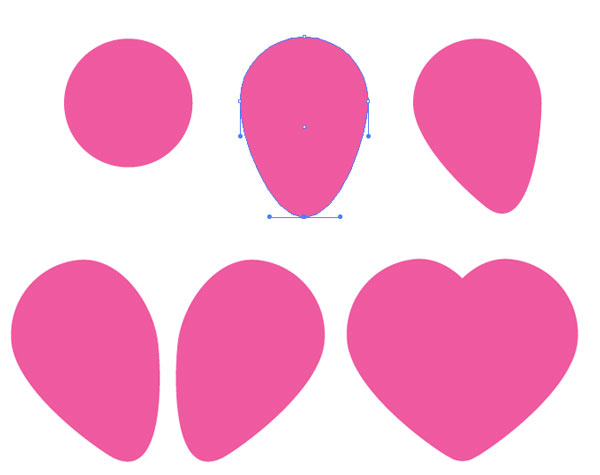
For the small heart that appears on some of the vintage badge vectors, draw a circle using the Ellipse Tool and use the Direct Selection Tool in order to pull the bottom anchor point downward. Rotate the teardrop shape inward so it’s at an angle. Copy, Paste, and Reflect the angled teardrop and overlap them so their bottom points intersect and form a heart.
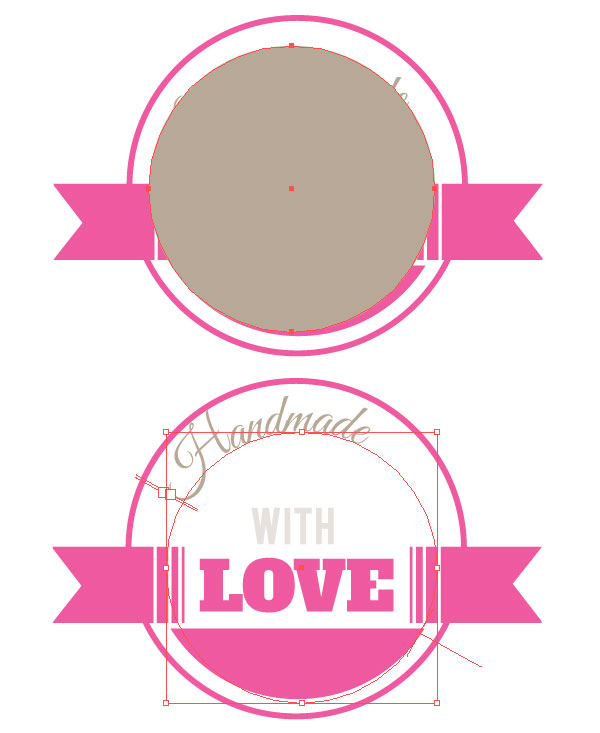
Step 10
The final touches of this particular badge vector design require a couple instances of text and a gray circle in the center of the design. Draw the circle with the Ellipse Tool and place it beneath the ribbon in the Layers panel. Choose two sans-serif fonts for the words “made” and “with”. I choseBebas for “made” and Akkurat Light Pro for “with”. Expand all of your text and Group your badge components together.

Step 11
For the rounded text on the other stamp designs, draw a circle in the center of one of the badges. Using the Type on a Path Tool, select the circle and type out “Handmade”. I chose Great Vibes, which is another lovely script font.
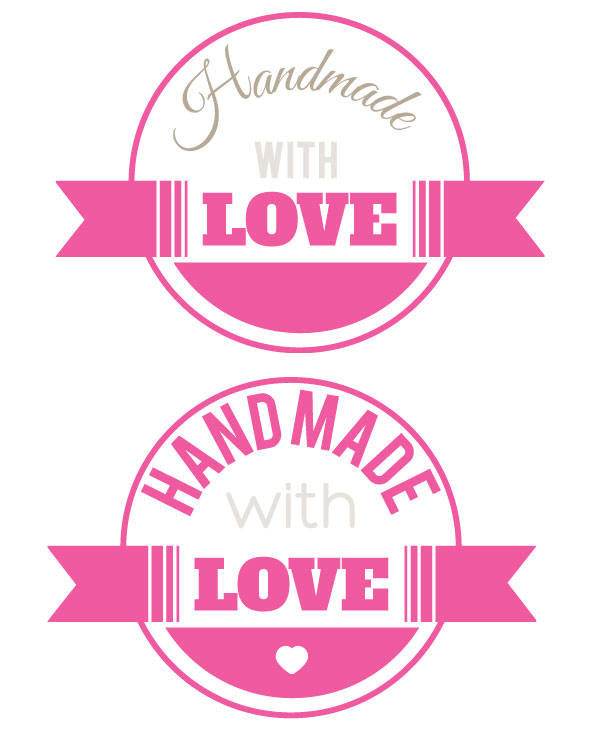
Step 12
Rotate, Scale, and Move the text as needed so it’s balanced within the design. For the other text choose a mono-spaced sans-serif for the word “with” (I chose Bebas again) and a slab-serif font for the word “Love” (I chose Alfa Slab). The second instance of “Handmade” below is Bebas once again. Expand all text and Group together the components of each badge.
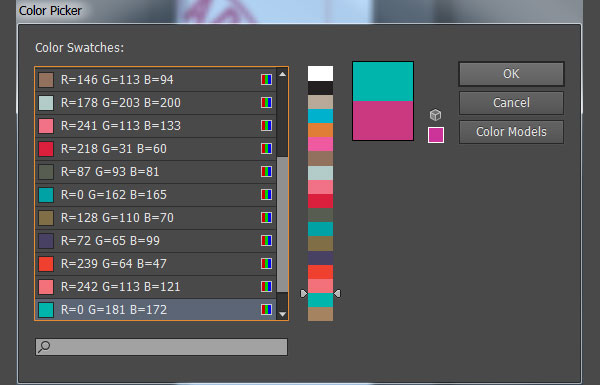
Step 13
In order to easily change the colors of your badge designs, select all of them and go to Edit > Edit Color > Recolor Artwork. Douible-Click the colors you want to change under New in order to change them.
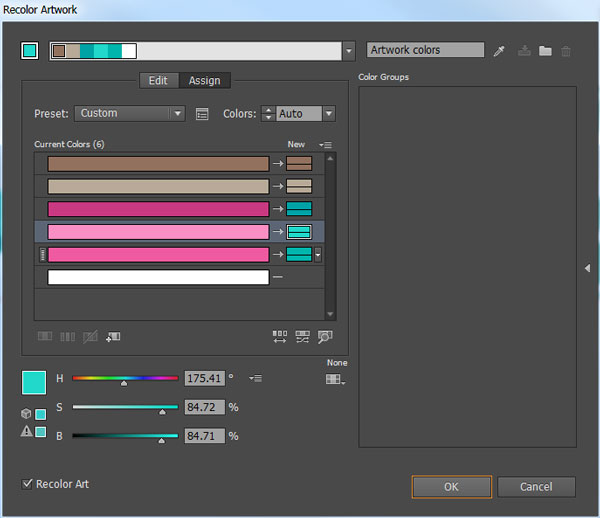
Choose from your already specified colors within the Swatches panel or take the Color Picker for a spin and create a new palette. Once you’re satisfied with your color changes, hit OK.
Great Job, You’re Done!
Now that you’ve completed your small set of badges, they’re ready to be printed onto price tags, on the backs of cards, or as labels and stickers for use with handmade products. Use these designs and techniques as a springboard for making other badge vector creations. The possibilities are quite simply endless. Enjoy!
Nếu bạn có nhu cầu học khóa học Adobe illustrator (Ai) vui lòng NHẤP VÀO ĐÂY để xem chi tiết về khóa học hoặc NHẤP VÀO ĐÂY để gửi thắc mắc về khóa học của bạn cho chúng tôi.
Những bài viết có nội dung liên quan khác:
Phím tắt trong phần mềm Illustrator (AI)
Giáo trình illustrator cs6 tiếng việt
Hệ thống bài học Adobe illustrator (Ai) (tiếng Việt) có hướng dẫn chi tiết - Bài 1
Hệ thống bài học Adobe illustrator (Ai) có hướng dẫn chi tiết - Bài 1 (Phiên bản gốc)
Hệ thống bài học Adobe illustrator (Ai) có hướng dẫn chi tiết - Bài 2 (Phiên bản gốc)
Hệ thống bài học Adobe illustrator (Ai) có hướng dẫn chi tiết - Bài 3 (Phiên bản gốc)
Hệ thống bài học Adobe illustrator (Ai) có hướng dẫn chi tiết - Bài 4 (Phiên bản gốc)
Hệ thống bài học Adobe illustrator (Ai) có hướng dẫn chi tiết - Bài 5 (Phiên bản gốc)
Hệ thống bài học Adobe illustrator (Ai) có hướng dẫn chi tiết - Bài 6 (Phiên bản gốc) Phần 1
Hệ thống bài học Adobe illustrator (Ai) có hướng dẫn chi tiết - Bài 6 (Phiên bản gốc) Phần 2
Trung tâm TIN HỌC KEY
ĐC : 203-205 Lê Trọng Tấn – Sơn Kỳ - Tân Phú – TPHCM
ĐT : (028) 22 152 521
Web : key.com.vn
Địa chỉ: 203 - 205 Lê Trọng Tấn, P. Sơn Kỳ, Q. Tân Phú, TP. HCM.
Điện thoại: (028) 22 152 521
Website: key.com.vn - Email: [email protected]
Địa chỉ: 765-767A (Số mới: 558-560A) Nguyễn Ảnh Thủ, P. Tân Chánh Hiệp, Q. 12, TP. HCM.
Điện thoại: (028) 2242 2244
Website: key.com.vn - Email: [email protected]