Turn Drab Text Into an Amazing Design Using This Simple USB Vector Text Effect
NHẤP VÀO ĐÂY để xem những bước trước đó ......
Step 18
Reselect your “main” shape and make two copies in front (CTRL + C > CTRL + F > CTRL + F). Select the top copy, and move it 2px up using the up arrow button from your keyboard. Reselect both copies made in this step, and click the Minus Front button from the Pathfinder panel. Make sure that the resulting shape is selected, and set the fill color at R=40 G=40 B=40.
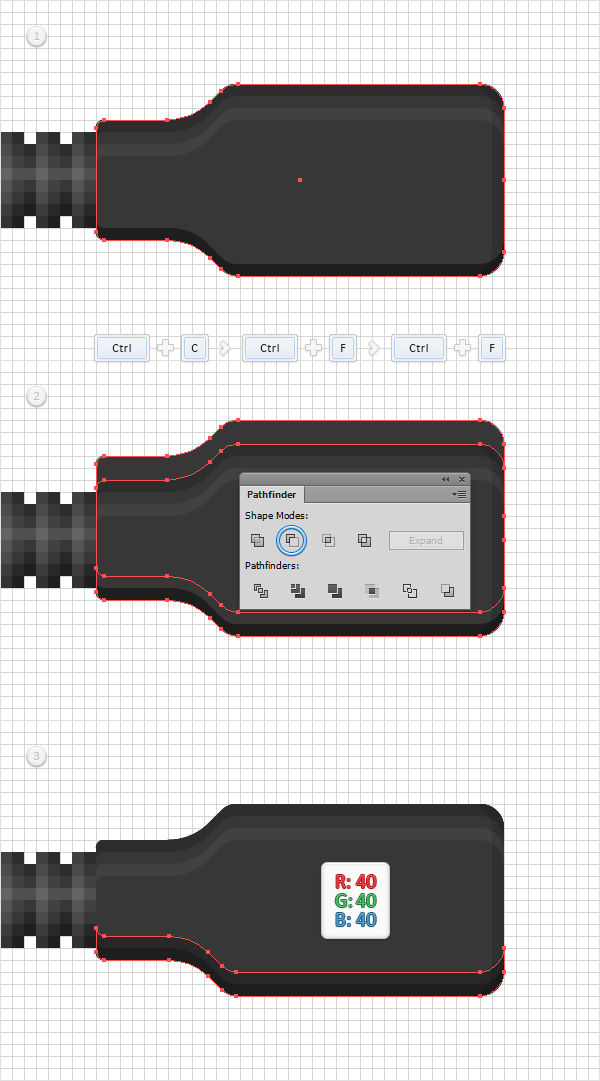
Step 19
Reselect your “main” shape, and make two copies in front (CTRL + C > CTRL + F > CTRL + F). Select the top copy, and move it 3px up using the up arrow button from your keyboard. Reselect both copies made in this step, and click the Minus Front button from the Pathfinder panel.

Step 20
Reselect your “main” shape, and make two copies in front (CTRL + C > CTRL + F > CTRL + F). Select the top copy, and move it 4px up using the up arrow button from your keyboard. Reselect both copies made in this step, and click the Minus Front button from the Pathfinder panel. Make sure that the resulting shape is selected, and set the fill color at R=65 G=65 B=65.

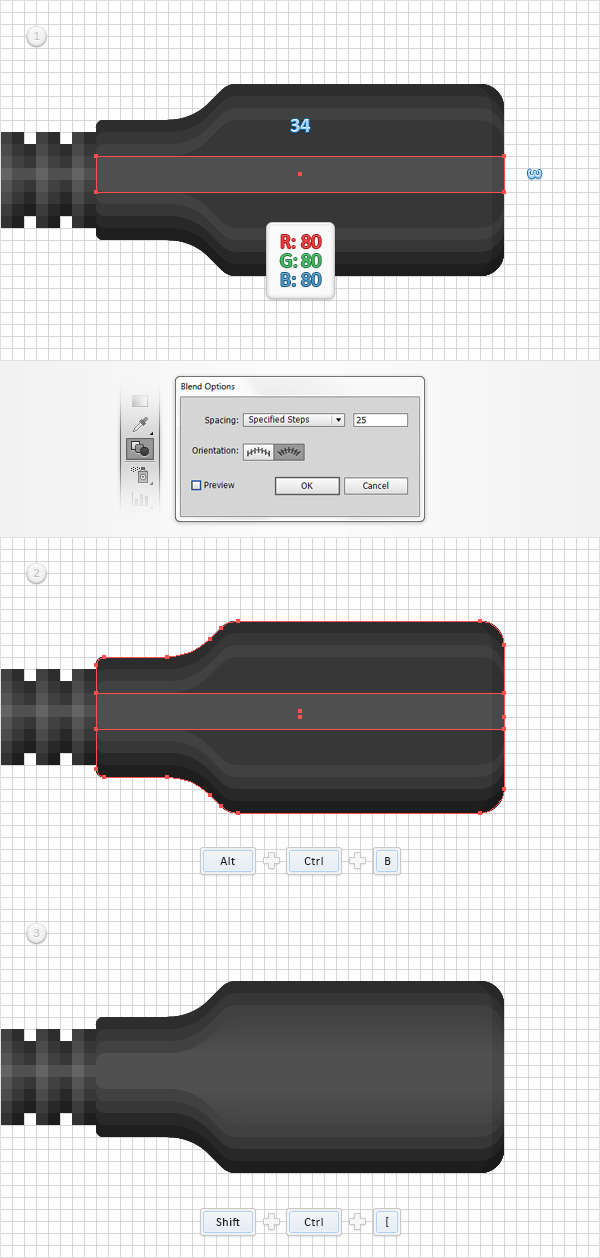
Step 21
Enable the Snap to Grid (View > Snap to Grid). Using the Rectangle Tool (M), create a 34 x 3px shape, set the fill color at R=80 G=80 B=80 and place it as shown in the first image. Focus on your Toolbar, and double click on the Blend Tool. Select Specified Steps from the Spacing drop-down menu, simply enter 25 in the white box, then click OK. Reselect the rectangle made in this step along with your “main” shape and simply hit Alt + CTRL + Bto create a simple blend. Make sure that your blend is selected, and send it to back (Shift + CTRL + [ ).
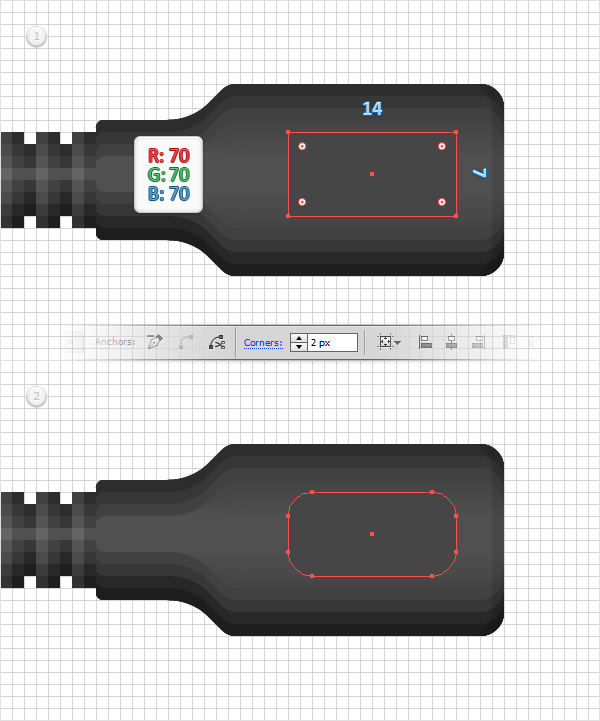
Step 22
Using the Rectangle Tool (M), create a 14 x 7px shape, set the fill color at R=70 G=70 B=70, and place it as shown in the first image. Switch to theDirect Selection Tool (A), select the four anchor points that make up this new rectangle, move to the top bar, and simply enter 2 in the Corners box. In the end, your rounded rectangle should look like in the second image.
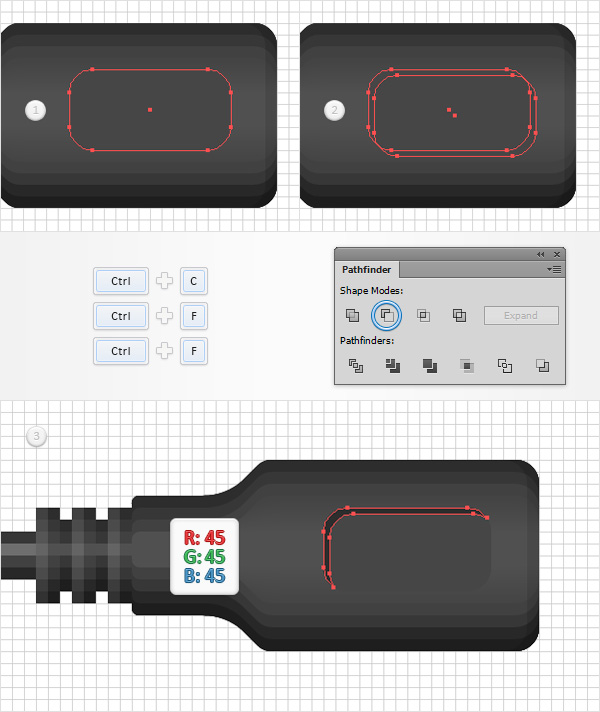
Step 23
Disable the Snap to Grid (View > Snap to Grid), then go to Edit > Preferences > General and set the Keyboard Increment at 0.5px. Reselect the rounded rectangle made in the previous step, and make two copies in front (CTRL + C > CTRL + F > CTRL + F). Select the top copy, and move it 0.5pxdown and 0.5px to the right using the arrow buttons from your keyboard. Reselect both copies made in this step, and click the Minus Front button from the Pathfinder panel. Fill the resulting shape with R=45 G=45 B=45.
Step 24
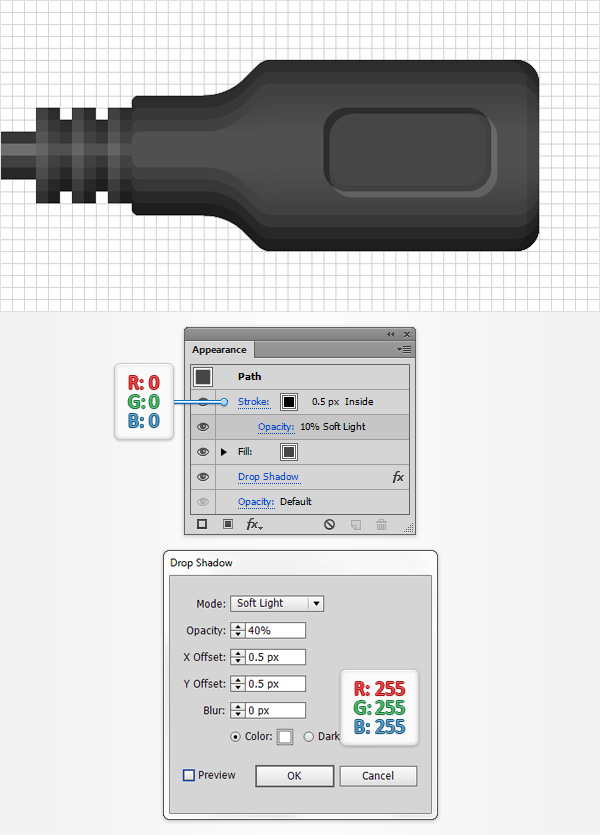
Reselect your 14 x 7px rounded rectangle, and go to Effect > Stylize > Drop Shadow. Enter the properties shown in the following image, and clickOK. Make sure that your rounded rectangle stays selected, and open the Appearance panel (Window > Appearance). Add a 0.5pt stroke, set the color at black, lower its Opacity to 10%, and change the Blending Mode to Soft Light. Make sure that the stroke stays selected, open the Stroke panel (Window > Stroke), and simply check the Align Stroke to Inside button.
Step 25
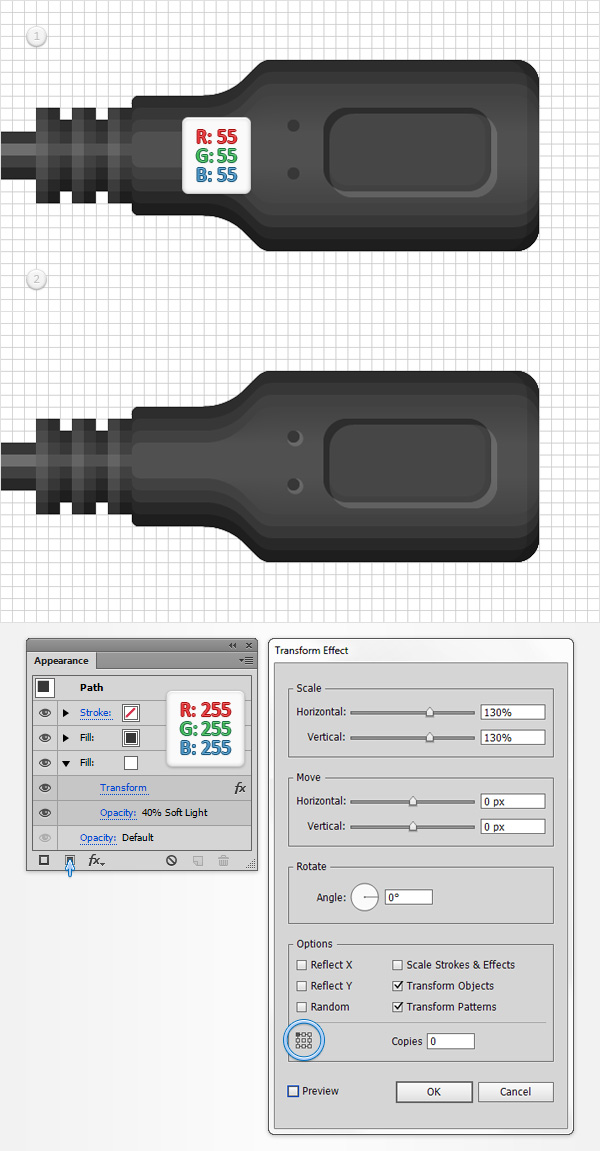
Enable the Snap to Grid (View > Snap to Grid). Using the Ellipse Tool (L), create two, 1px circles, set their fill color at R=55 G=55 B=55, and place them as shown in the first image. Make sure that both shapes remain selected, focus on the Appearance panel, and add a second fill using the Add New Fill button (pointed by the little, blue arrow in the following image). Keep focusing on the Appearance panel, select the bottom fill, set the color at white, lower its Opacity to 40%, and change the Blending Mode to Soft Light. Then go to Effect > Distort & Transform > Transform. Enter the properties shown in the following image, make sure that you check the top, left reference point, and then click OK.
Step 26
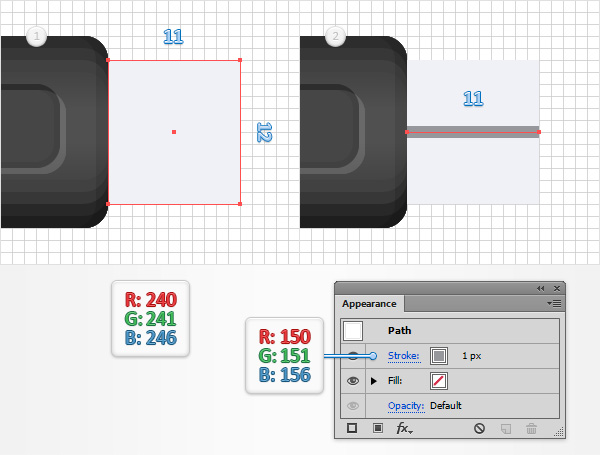
Using the Rectangle Tool (M), create an 11 x 12px shape, set the fill color at R=240 G=241 B=246, and place it as shown in the first image. Switch to the Pen Tool (P) and create an 11px, horizontal path. Place it as shown in the second image, and add a 1px stroke with the color set at R=150 G=151 B=156.
Step 27
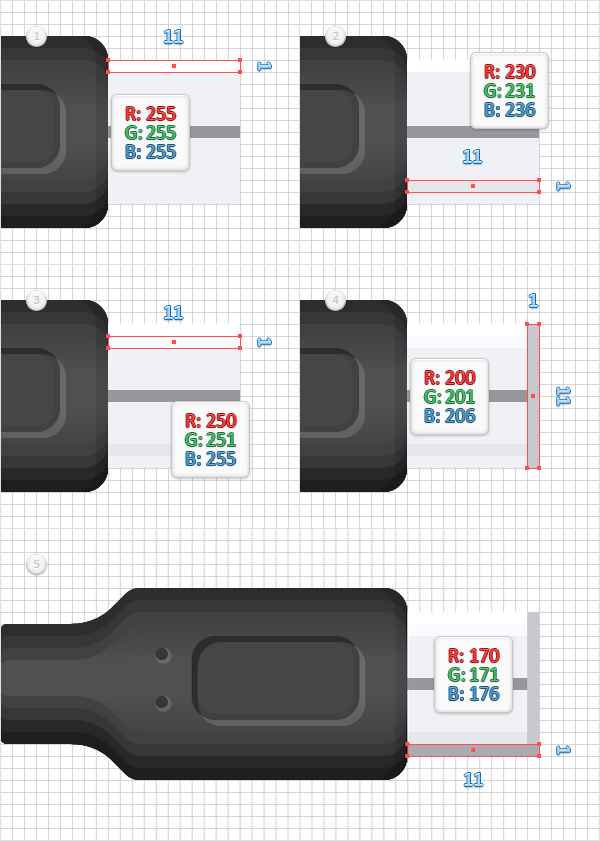
Using the Rectangle Tool (M), create an 11 x 1px shape, set the fill color at white (R=255 G=255 B=255) and place it as shown in the first image. Using the same tool, create a second 11 x 1px shape, set the fill color at R=230 G=231 B=236, and place it as shown in the second image. Create a third 11 x 1px shape, set the fill color at R=250 G=251 B=255 and place it as shown in the third image. Create a 1 x 11px shape, set the fill color atR=200 G=201 B=206, and place it as shown in the fourth image. Finally, create a new 11 x 1px shape, set the fill color at R=170 G=171 B=176, and place it as shown in the fifth image.
Step 28
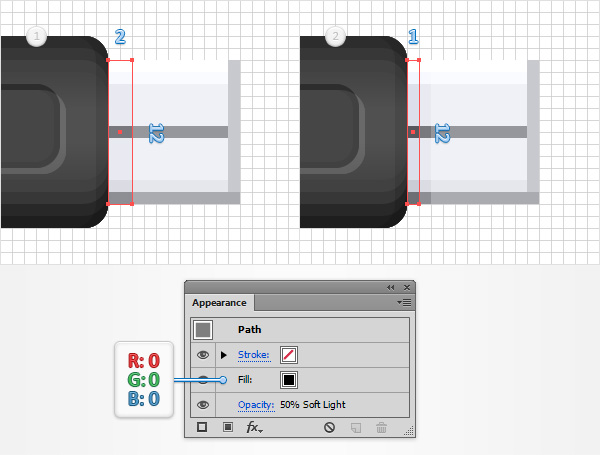
Using the Rectangle Tool (M), create a 2 x 12px shape and a 1 x 11px rectangle, and place them as shown in the following images. Fill both shapes with black, lower the Opacity to 50%, and change the Blending Mode to Soft Light.
Step 29
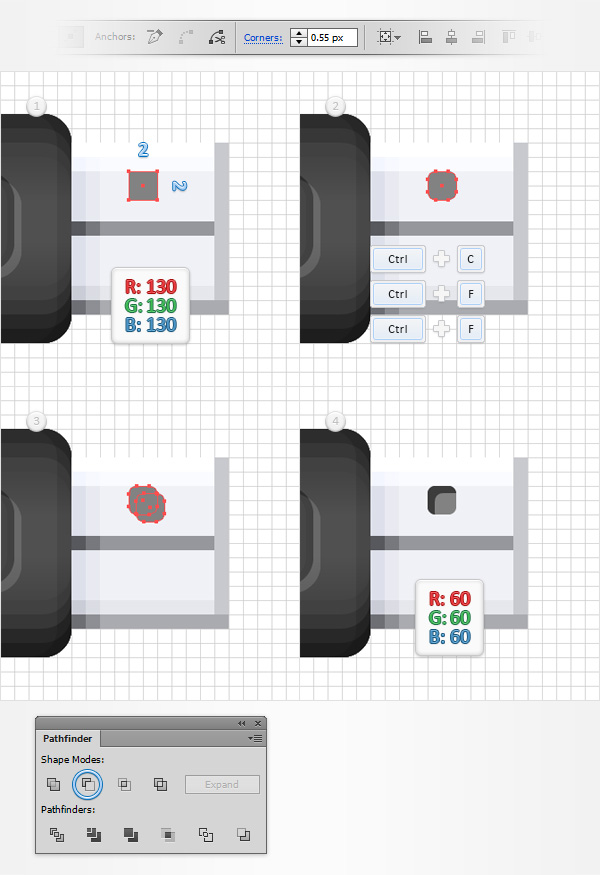
Using the Rectangle Tool (M), create a 2px square, set the fill color at R=130 G=130 B=130, and place it as shown in the first image. Switch to theDirect Selection Tool (A), select the four anchor points that make up this tiny shape, move to the top bar, and simply enter 0.55 in the Corners box. In the end, your rounded rectangle should look like in the second image. Reselect it, make two copies in front (CTRL + C > CTRL + F > CTRL + F) and disable the Snap to Grid (View > Snap to Grid). Select the top copy, and move it 0.5px dow and 0.5px to the right. Reselect both copies, and click theMinus Front button from the Pathfinder panel. Fill the resulting shape with R=60 G=60 B=60.
Step 30
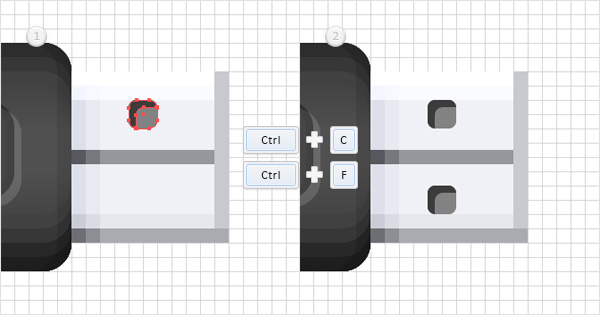
Enable the Snap to Grid (View > Snap to Grid). Reselect the two shapes made in the previous step and duplicate them (CTRL + C > CTRL + F). Select those copies, and simply drag them several pixels down as shown in the following image.
Step 31
Select all the shapes highlighted in the first image and go to Object > Expand Apperance. Then hit CTRL + G to Group them. Make sure that this new group is selected, and go to Object > Transform > Reflect. Check the Vertical box, and click the Copy button. Select the newly created group, and simply drag it to the left as shown in the fourth image.

Step 32
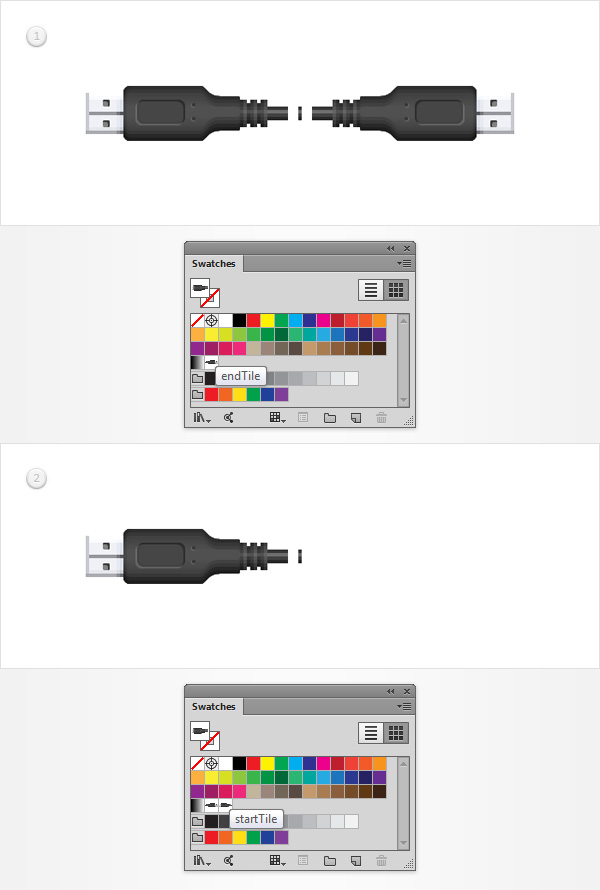
Select your right group of shapes and simply drag it inside the Swatches panel (Window > Swatches) to save it as a pattern. Once you can see it in the Swatches panel, you can remove that group of shapes from your artboard. Return to the Swatches panel, double click on your pattern and name it “endTile“. Select the left group of shapes, and turn it your second pattern. Name it “startTile“, then simply remove the group of shapes that you used to create this second pattern.
Step 33
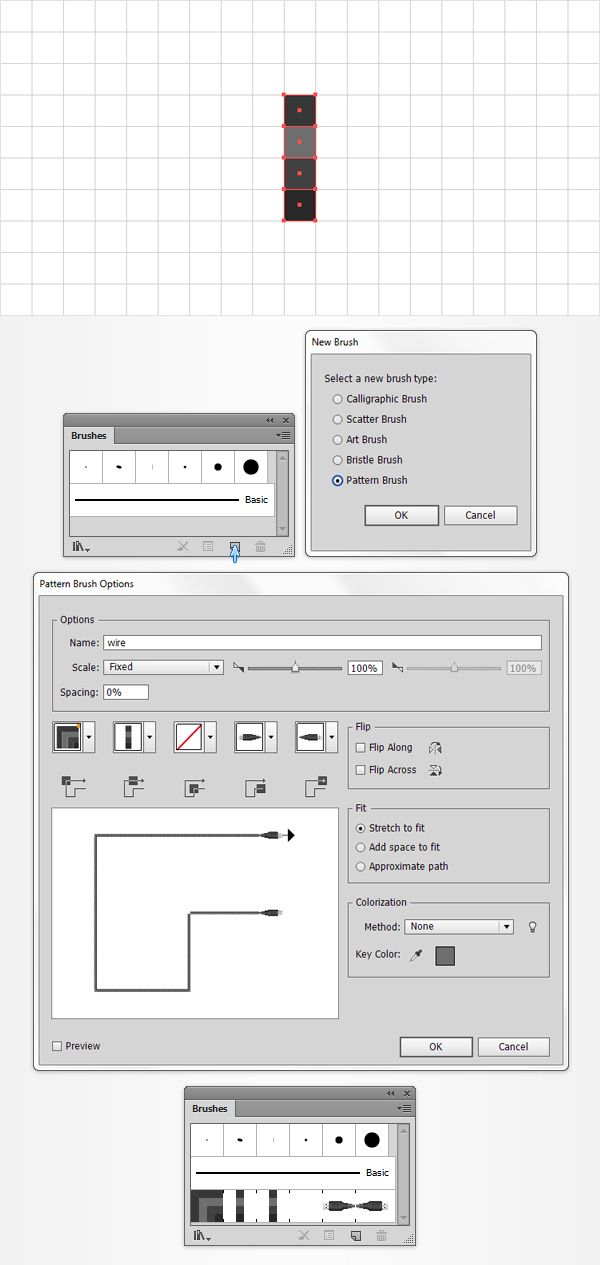
Focus on your artboard, select the remaining group of shapes, open the Brushes panel (Window > Brushes), and click the New Brush button (pointed by the little, blue arrow in the following image). Check the Pattern Brush box, then click OK to open the Pattern Brush Options window. Enter “wire” in the Name box, then move down to the Tile boxes. Open the Start Tile drop down window, and add the “startTile” pattern from the list. Then open the End Tile drop down window, and add the “endTile” pattern. Finally, click OK and you should find your new pattern brush inside the Brushes panel. Once you can see it, simply remove the group of shapes that you used to create it.
Step 34
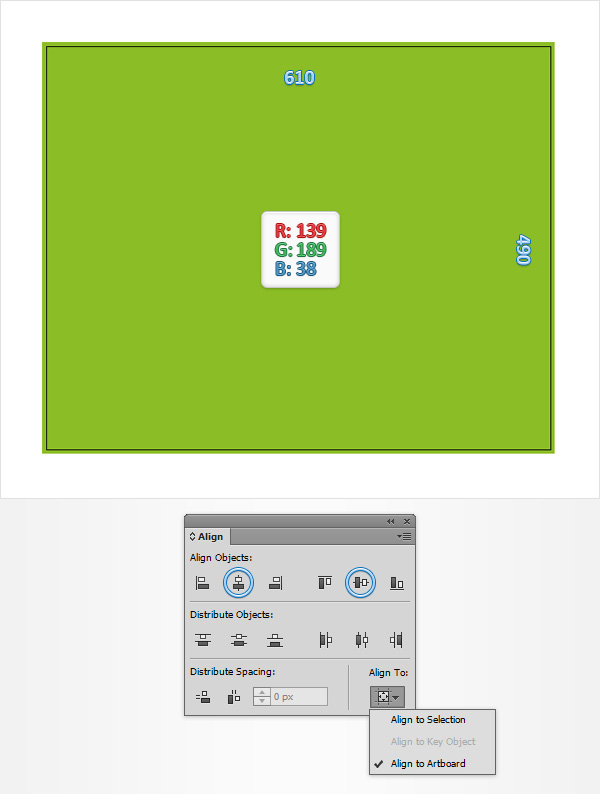
Disable the Grid (View > Hide Grid) and the Snap to Grid (View > Snap to Grid). Pick the Rectangle Tool (M), and simply click on your artboard to open the Rectangle window. Enter 610 in the Width box and 490 in the Height box; then click OK. Fill this new shape with R=139 8 G=189 B=38. Next, you need to center this rectangle, so open the Align panel (Window > Align). Set the aligning to Artboard (open the fly out menu and go toShow Options if you can’t see the Align To section as shown in the following image). Then simply click the Horizontal AlignCenter and Vertical Align Center buttons. In the end, your rectangle should cover the entire artboard.
Step 35
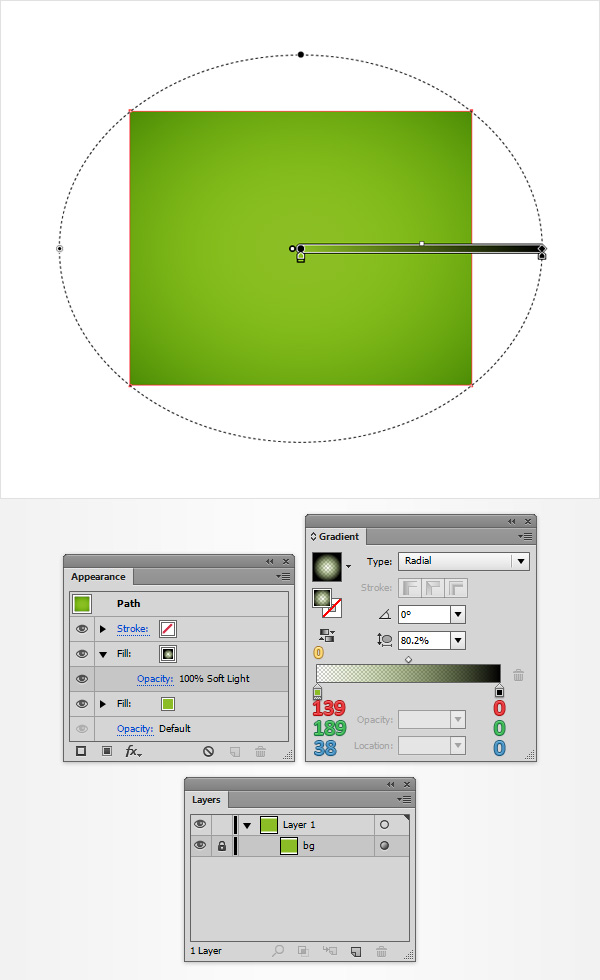
Make sure that your green rectangle is still selected, focus on the Appearance panel, and add a second fill using that same Add New Fill button. Select this new fill, open the Gradient panel (Window > Gradient), and simply click on the gradient thumbnail to add the default black to white linear gradient. Keep focusing on your Gradient panel, select Radial from the Type drop-down menu, then move to the gradient colors. Select the right slider and set the color at black; then select the left slider, set the color at R=139 G=189 B=38 and lower its Opacity to 0%. Make sure that the second fill stays selected, grab the Gradient Tool (G), focus on your artboard and stretch that gradient as shown in the following image. Return to the Appearance panel, reselect the fill added in this step, and change its Blending Mode to Soft Light. Move to the Layers panel, double click on your green rectangle, name it “bg“, then simply lock it.
Step 36
Pick the Type Tool (T), click on your artboard and add your white piece of text. Make sure that it stays selected, and open the Character panel (Window > Type > Character). Select the Edwardian Script ITC font, then set the size at 275pt. Lower the Opacity of your text to 30%, then move to the Layers panel and simply lock it to make sure that you won’t accidentally select/move it.

Step 37
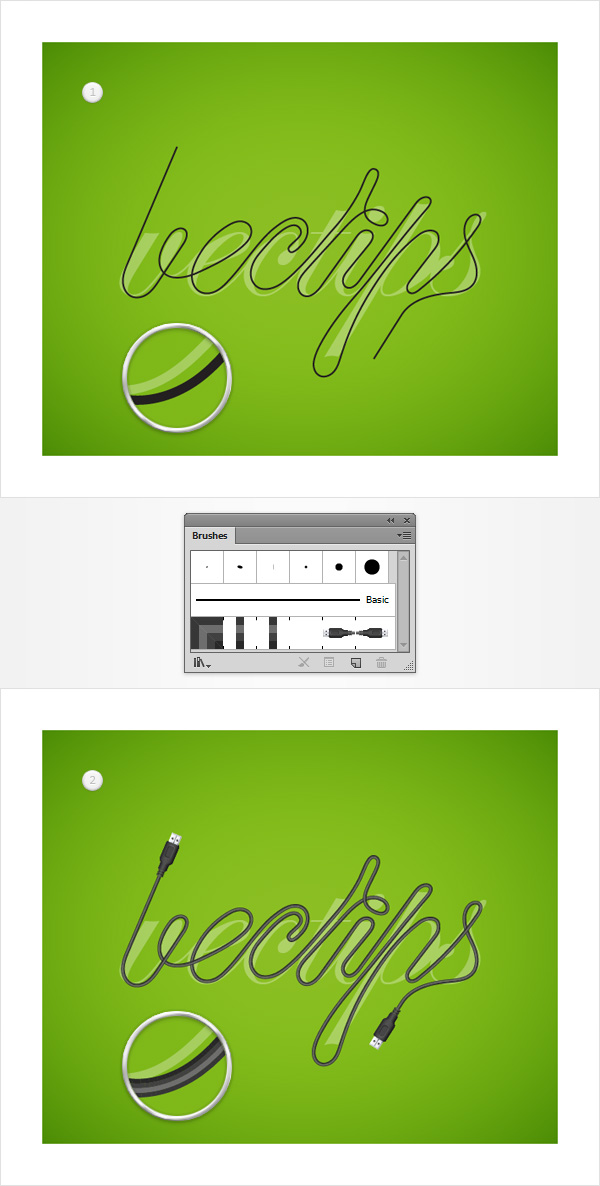
Now the more challenging path. Using the Pen Tool (P) or the Brush Tool (B) (or if you happen to own a tablet), draw a smooth path along your text as shown in the following image. Try to use the text in the back as a rough reference. For starters, use a simple, black stroke for your path. Once you feel that it looks good enough, replace the black stroke with your “wire” pattern brush. Move to the Layers panel, double click on the path made in this step, and simply name it “WIRE“.
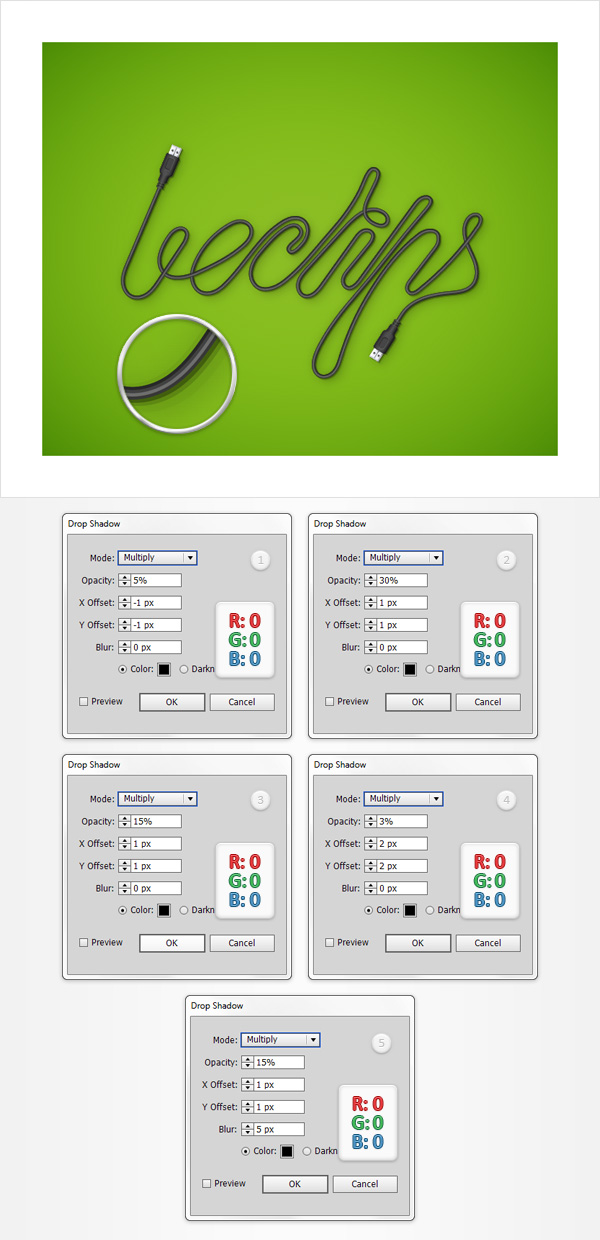
Step 38
Get grid of that locked piece of text. Reselect your “WIRE” path and simply add the five Drop Shadow effects (Effect > Stylize > Drop Shadow) shown in the following image.
Nếu bạn có nhu cầu học khóa học Adobe illustrator (Ai) vui lòng NHẤP VÀO ĐÂY để xem chi tiết về khóa học hoặc NHẤP VÀO ĐÂY để gửi thắc mắc về khóa học của bạn cho chúng tôi.
Những bài viết có nội dung liên quan khác:
Phím tắt trong phần mềm Illustrator (AI)
Giáo trình illustrator cs6 tiếng việt
Hệ thống bài học Adobe illustrator (Ai) (tiếng Việt) có hướng dẫn chi tiết - Bài 1
Hệ thống bài học Adobe illustrator (Ai) có hướng dẫn chi tiết - Bài 1 (Phiên bản gốc)
Hệ thống bài học Adobe illustrator (Ai) có hướng dẫn chi tiết - Bài 2 (Phiên bản gốc)
Hệ thống bài học Adobe illustrator (Ai) có hướng dẫn chi tiết - Bài 3 (Phiên bản gốc)
Hệ thống bài học Adobe illustrator (Ai) có hướng dẫn chi tiết - Bài 4 (Phiên bản gốc)
Hệ thống bài học Adobe illustrator (Ai) có hướng dẫn chi tiết - Bài 5 (Phiên bản gốc)
Hệ thống bài học Adobe illustrator (Ai) có hướng dẫn chi tiết - Bài 6 (Phiên bản gốc) Phần 1
Hệ thống bài học Adobe illustrator (Ai) có hướng dẫn chi tiết - Bài 6 (Phiên bản gốc) Phần 2
Hệ thống bài học Adobe illustrator (Ai) có hướng dẫn chi tiết - Bài 7 (Phiên bản gốc)
Hệ thống bài học Adobe illustrator (Ai) có hướng dẫn chi tiết - Bài 8 (Phiên bản gốc)
Hệ thống bài học Adobe illustrator (Ai) có hướng dẫn chi tiết - Bài 9 (Phiên bản gốc)
Hệ thống bài học Adobe illustrator (Ai) có hướng dẫn chi tiết - Bài 10 (Phiên bản gốc) Phần 1
Hệ thống bài học Adobe illustrator (Ai) có hướng dẫn chi tiết - Bài 10 (Phiên bản gốc) Phần 2
Địa chỉ: 203 - 205 Lê Trọng Tấn, P. Sơn Kỳ, Q. Tân Phú, TP. HCM.
Điện thoại: (028) 22 152 521
Website: key.com.vn - Email: [email protected]
Địa chỉ: 765-767A (Số mới: 558-560A) Nguyễn Ảnh Thủ, P. Tân Chánh Hiệp, Q. 12, TP. HCM.
Điện thoại: (028) 2242 2244
Website: key.com.vn - Email: [email protected]