NHẤP VÀO ĐÂY ĐỂ XEM CÁC BƯỚC TRƯỚC.....
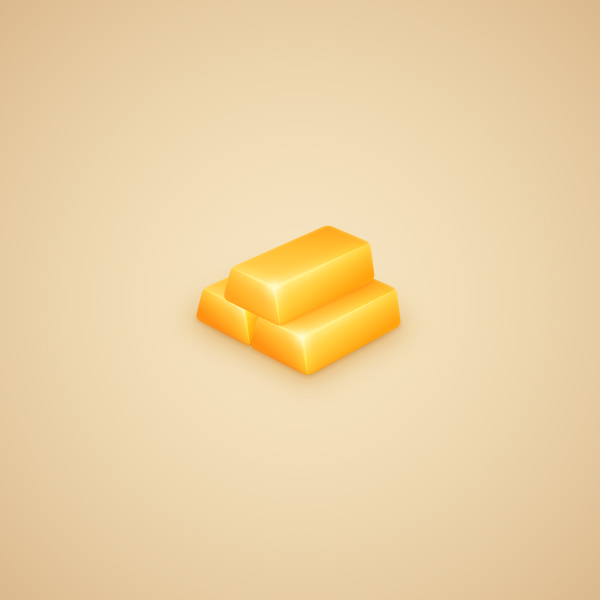
Eureka! Create Your Own Gold Icon Vector
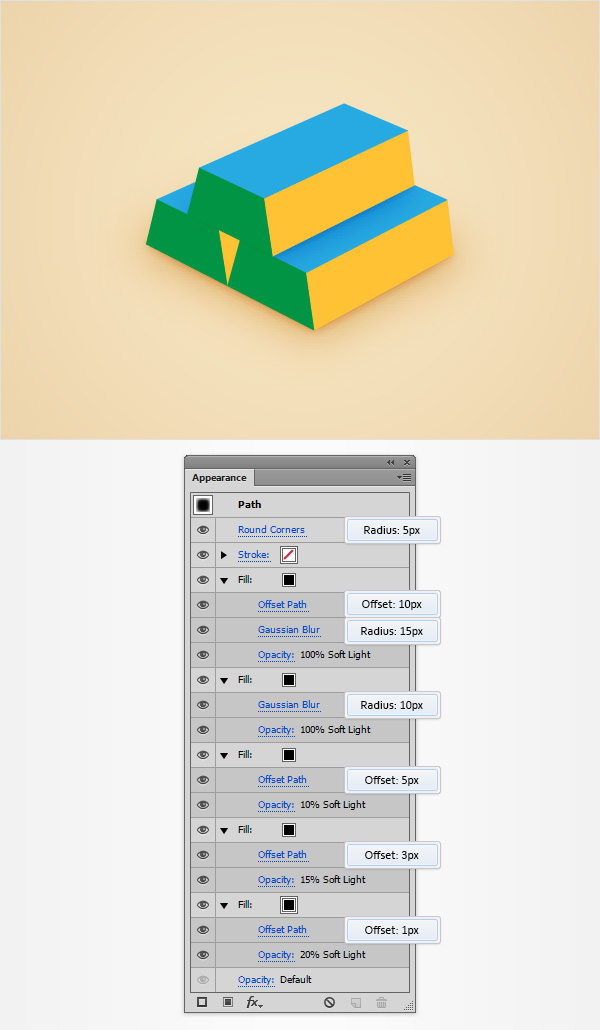
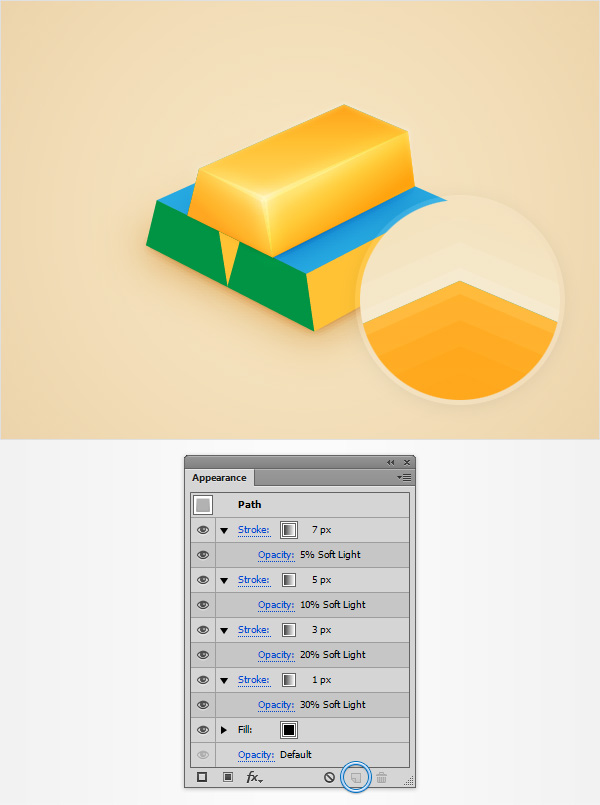
Step 16
Make sure that the black shape made in the previous step stays selected and focus on the Appearance panel. First, select the existing fill, lower itsOpacity to 20%, change the Blending Mode to Soft Light and go to Effect > Path > Offset Path. Enter a 1px Offset and click OK. Return to theAppearance panel and add a second fill for this shape using that same Add New Fill button. Select the newly added fill, lower its Opacity to 15%, change the Blending Mode to Soft Light and go to Effect > Path > Offset Path. Enter a 3px Offset, click OK then return to the Appearance panel and add a third fill for your shape. Select the new fill, lower its Opacity to 10%, change the Blending Mode to Soft Light and go to Effect > Path > Offset Path. Enter a 5px Offset, click OK then return to the Appearance panel and add a fourth fill. Select this new fill, change the Blending Mode to Soft Light and go to Effect > Blur > Gaussian Blur. Enter a 10px Radius, click OK then return to the Appearance panel and add one final fill. Select it, change the Blending Mode to Soft Light and go to Effect > Path > Offset Path. Enter a 10px Offset, click OK and go to Effect > Blur > Gaussian Blur. Enter a 15px Radius and click OK. Get back to the Appearance panel, make sure that the entire path is selected and go to Effect > Stylize > Rounded Corners. Enter a 5px Radius and click OK.
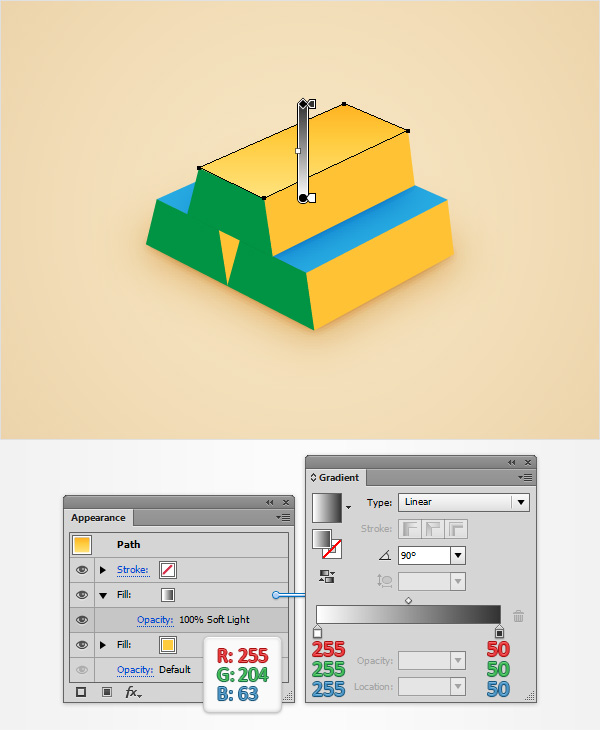
Step 17
Focus on the shapes that make up your top ingot gold icon vector. Select the shape that makes up the top side of the ingot and simply replace the existing fill color with R=255 G=204 B=63. Make sure that this shape stays selected, focus on the Appearance panel and add a second fill using that same Add New Fill button. Select this new fill, change its Blending Mode to Soft Light and replace the existing color with the linear gradient shown in the following image.
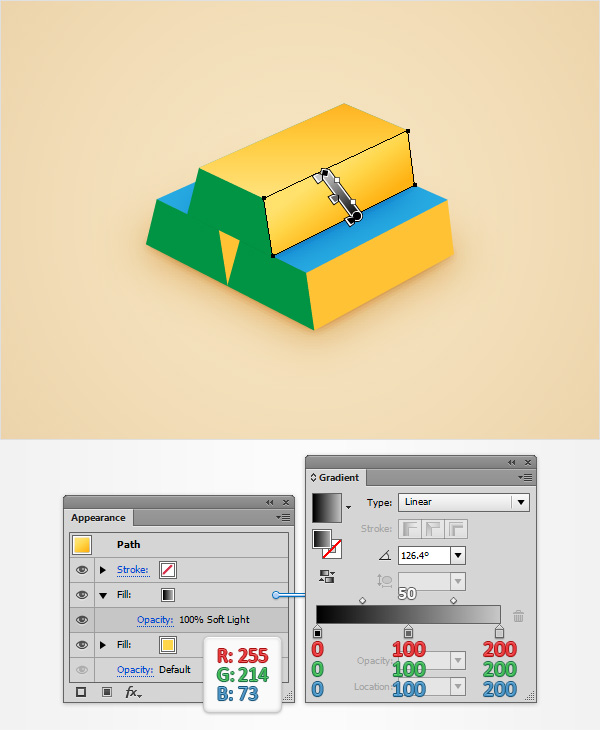
Step 18
Keep focusing on the shapes that make up the top ingot. Select the one that makes up the right side of the ingot gold icon vector and simply replace the existing fill color with R=255 G=214 B=73. Add a second fill for this shape, select it, change its Blending Mode to Soft Light and replace the existing color with the linear gradient shown in the following image.
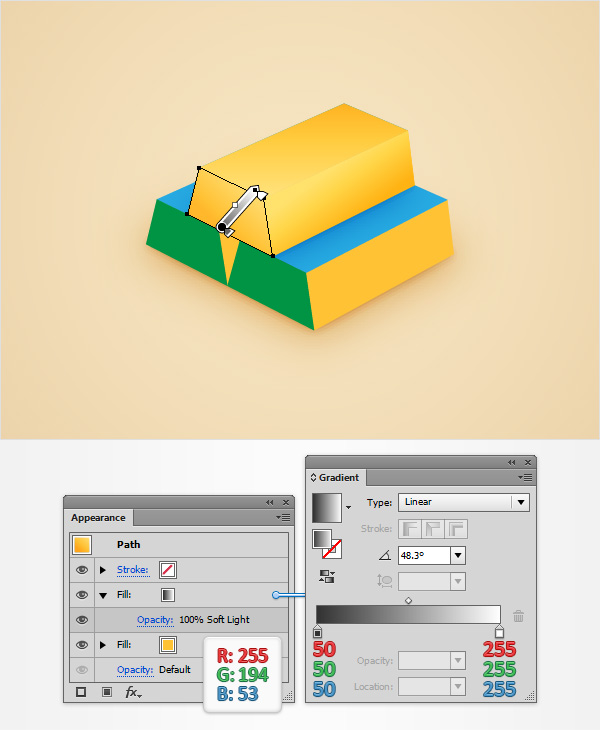
Step 19
Keep focusing on the shapes that make up the top ingot. Select the one that makes up the left side of the ingot and simply replace the existing fill color with R=255 G=194 B=53. Add a second fill for this shape, select it, change its Blending Mode to Soft Light and replace the existing color with the linear gradient shown in the following image.
Step 20
Disable the Snap to Grid (View > Snap to Grid) and enable the Smart Guides (Control + U). Using the Pen Tool (P), create a simple path across the left side of the shape that makes up the top side of your top ingot as shown in the following image. For the moment add a simple black stroke for this path and make sure that there is no color set for the fill.
Step 21
Using the same tool and technique mentioned in the previous step add another two paths as shown in the following image. Make sure that you’re always drawing these paths from the outside to the inside of your ingot.

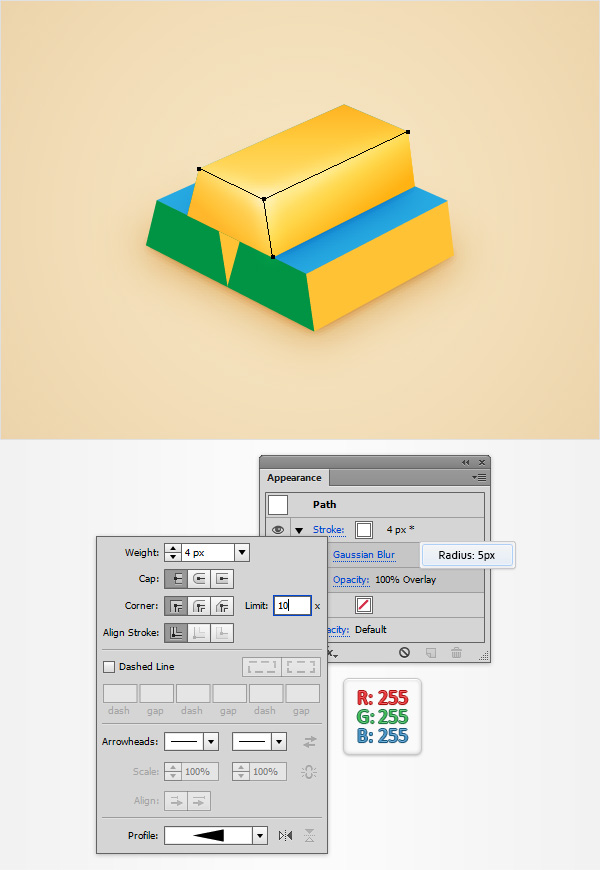
Step 22
Disable the Smart Guides (Control + U). Make sure that all three paths are selected and focus on the Appearance panel. Select the existing stroke, replace the existing color with white, change its Blending Mode to Overlay and go to Effect > Blur Gaussian Blur. Enter a 5px Radius, click OK then return to the Appearance panel and simply click on the Stroke piece of text to open the Stroke fly-out panel. Set the Weight at 4px and check theWidth Profile 4 from the Profile section.
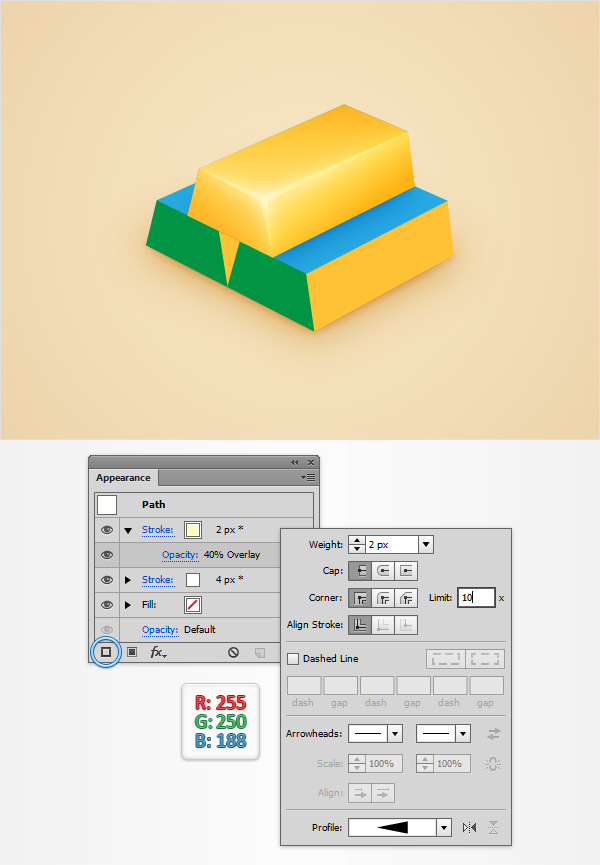
Step 23
Make sure that your three paths are still selected, focus on the Appearance panel and add a second stroke using the Add New Stroke button (pointed by the blue circle in the following image). Select this new stroke, replace the existing color with R=255 G=250 B=188, lower its Opacity to40%, change the Blending Mode to Overlay and open the Stroke fly-out panel. Set the Weight at 2px and check the Width Profile 4 from the Profilesection.
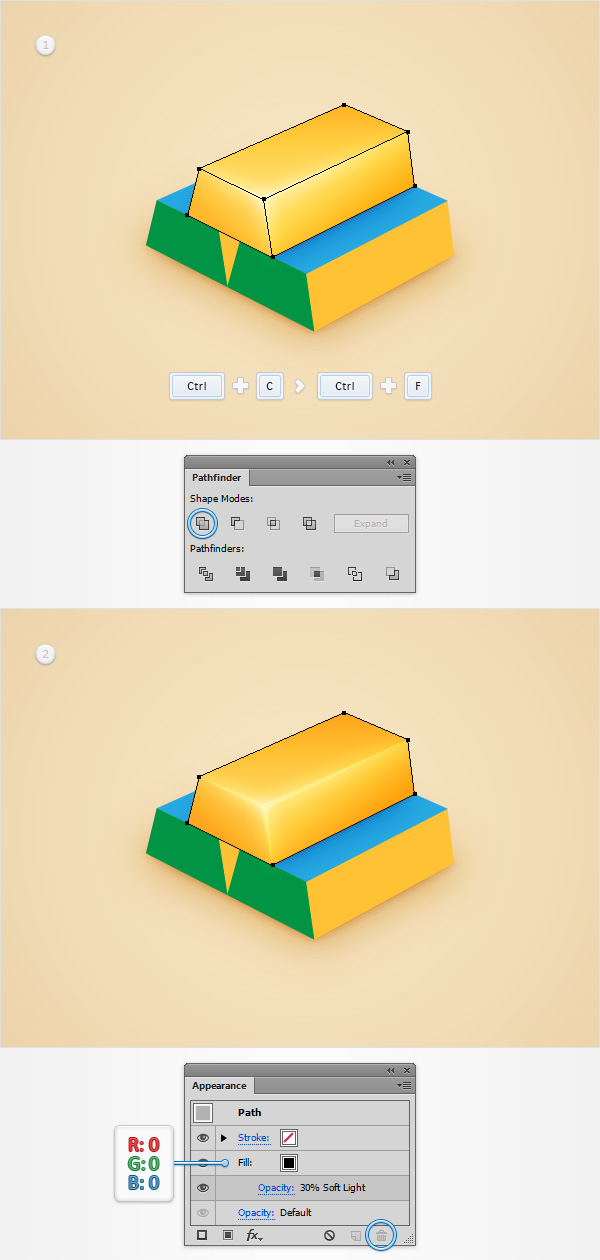
Step 24
Reselect the group of three shapes that makes up your top ingot gold icon vector and duplicate it (Control + C > Control + F). Select this copy and simply click the Unite button from the Pathfinder panel. Make sure that this newly created shape stays selected and focus on the Appearance panel. Remove the top fill using the Delete Selected Item button (pointed by the blue circle in the following image) then select the remaining fill. Set the color at black, lower its Opacity to 30% and change the Blending Mode to Soft Light. Move to the Layers panel, simply double click on the shape made in this step and rename it “recolor“.
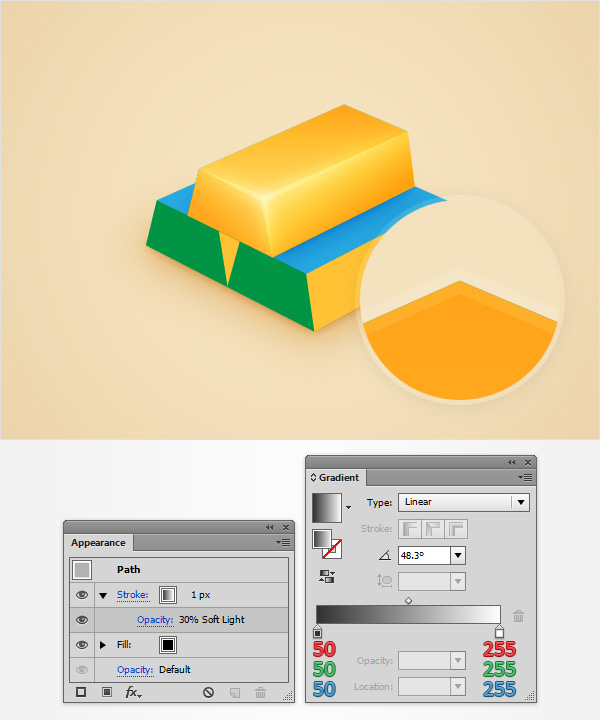
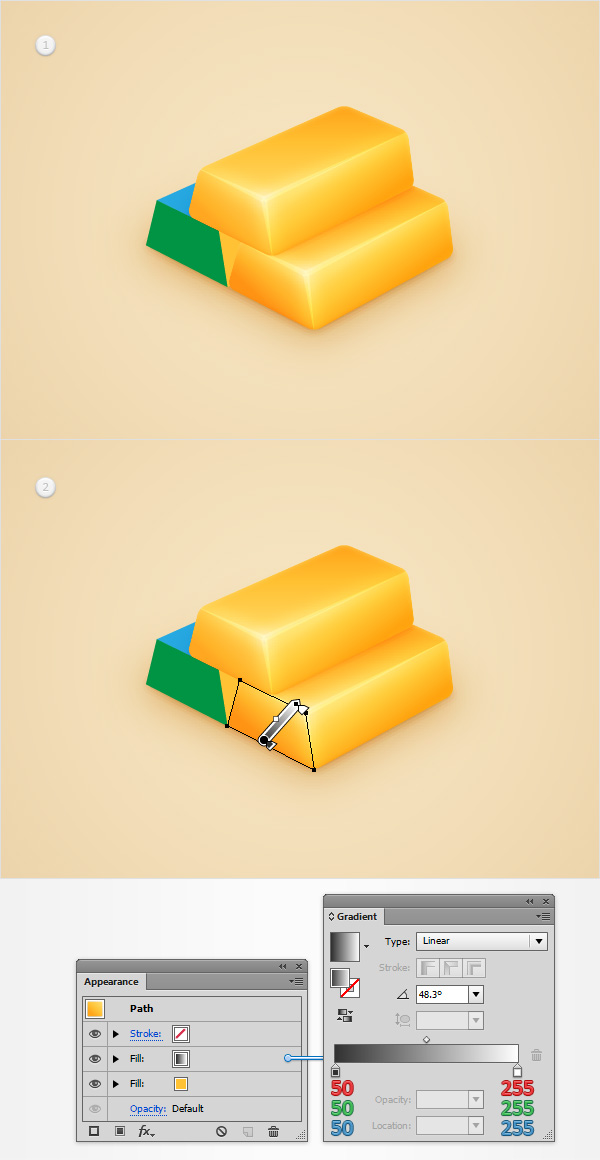
Step 25
Make sure that your “recolor” shape stays selected, focus on the Appearance panel and add a 1px stroke. Select this thin stroke, lower its Opacity to30%, change the Blending Mode to Soft Light and replace the flat color with the linear gradient shown in the following image.
Step 26
Make sure that your “recolor” shape stays selected, focus on the Appearance panel, select the existing stroke and make three copies using that sameDuplicate Selected Item button. Focus on the new strokes, select the bottom one, lower its Opacity to 20% and increase the Weight to 3px. Move up to the next new stroke, lower its Opacity to 10% and increase the Weight to 5px. Finally, select the top stroke, lower its Opacity to 5px and increase the Weight to 7px.
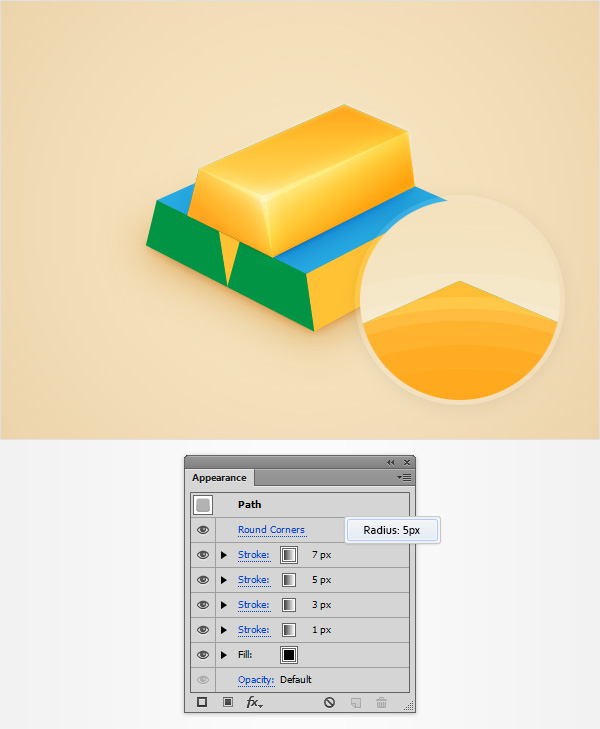
Step 27
Reselect your “recolor” shape, make sure that the entire path is selected and go to Effect > Stylize > Rounded Corners. Enter a 5px Radius and click OK.
Step 28
Select all the shapes that mke up your top ingot gold icon vector and Group them (Control + G). Move to the Layers panel, rename this new group “topIngot” then duplicate it (Control + C > Control + F). Select this fresh copy and click the Unite button from the Pathfinder panel. Make sure that the resulting shape stays selected and focus on the Appearance panel. Set the fill color at white, make sure that there is no other fill or stroke then go to Effect > Stylize > Rounded Corners. Enter a 5px Radius and click OK.

Step 29
Reselect the white shape and the “topIngot” group made in the previous step and simply click the Make Mask button from the Transparency panel. In the end things should look like in the second image.

Step 30
Focus on the group of shapes that make up your right ingot and simply repeat the techniques and effects used for the top ingot. Once you’re done, you will have to make only one little change for the shape that makes up the left side of this ingot. Simply replace the existing linear gradient with the one shown in the following image.
Do the same thing with the shapes that make up your left ingot gold icon vector and you’re done.
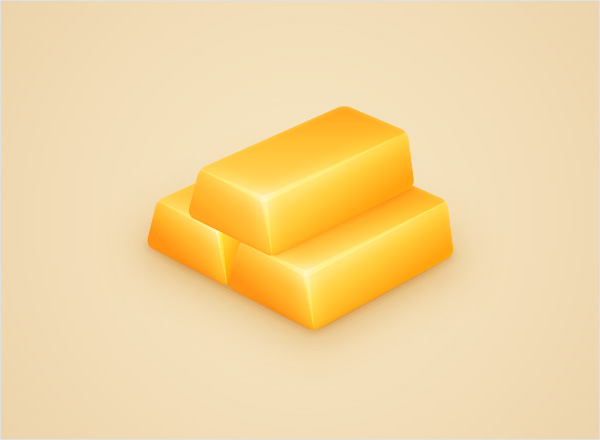
And We’re Done!
I hope you’ve enjoyed this gold icon vector tutorial and I hope you can apply these techniques in your future projects.
Nếu bạn có nhu cầu học khóa học Adobe illustrator (Ai) vui lòng NHẤP VÀO ĐÂY để xem chi tiết về khóa học hoặc NHẤP VÀO ĐÂY để gửi thắc mắc về khóa học của bạn cho chúng tôi.
Những bài viết có nội dung liên quan khác:
Phím tắt trong phần mềm Illustrator (AI)
Giáo trình illustrator cs6 tiếng việt
Hệ thống bài học Adobe illustrator (Ai) (tiếng Việt) có hướng dẫn chi tiết - Bài 1
Hệ thống bài học Adobe illustrator (Ai) có hướng dẫn chi tiết - Bài 1 (Phiên bản gốc)
Hệ thống bài học Adobe illustrator (Ai) có hướng dẫn chi tiết - Bài 2 (Phiên bản gốc)
Hệ thống bài học Adobe illustrator (Ai) có hướng dẫn chi tiết - Bài 3 (Phiên bản gốc)
Hệ thống bài học Adobe illustrator (Ai) có hướng dẫn chi tiết - Bài 4 (Phiên bản gốc)
Hệ thống bài học Adobe illustrator (Ai) có hướng dẫn chi tiết - Bài 5 (Phiên bản gốc)
Hệ thống bài học Adobe illustrator (Ai) có hướng dẫn chi tiết - Bài 6 (Phiên bản gốc) Phần 1
Trung tâm TIN HỌC KEY
ĐC : 203-205 Lê Trọng Tấn – Sơn Kỳ - Tân Phú – TPHCM
ĐT : (028) 22 152 521
Web : key.com.vn
Địa chỉ: 203 - 205 Lê Trọng Tấn, P. Sơn Kỳ, Q. Tân Phú, TP. HCM.
Điện thoại: (028) 22 152 521
Website: key.com.vn - Email: [email protected]
Địa chỉ: 765-767A (Số mới: 558-560A) Nguyễn Ảnh Thủ, P. Tân Chánh Hiệp, Q. 12, TP. HCM.
Điện thoại: (028) 2242 2244
Website: key.com.vn - Email: [email protected]