là một chương trình vẽ vector, thường được sử dụng để vẽ hình minh hoạ, hoạt hình, biểu đồ, đồ thị. Adobe Illustrator được dùng để thiết kế : như thiết kế những sản phẩm trong ngành thiết kế quảng cáo, thiết kế in ấn, thiết kế logo, thiết kế bản hiệu, thiết kế thời trang, thiết kế thiệp mời, Tạo các sản phẩm tờ rơi, Cataloge, Card Visit, Broucher, Profile,vẽ hoạt hình, tích hợp chuyển động cho Flash...Adobe Illustrator ưu diểm là dễ dàng thay đổi và trao đổi dữ liệu ,kích thước file nhẹ, dễ dàng tương thích với Photoshop, Corel Draw, và hỗ trợ in ấn rất tốt.
Hôm nay, trung tâm TIN HỌC KEY xin giới thiệu đến các bạn một hệ thống bài tập thực hành vẽ các đối tượng trong Adobe illustrator (Ai) (phiên bản tiếng anh, theo: vectips.com) có hướng dẫn chi tiết các bước thực hiện cụ thể để các bạn dễ dàng thực hành theo. Hôm nay chúng ta sẽ học bài 5: Summer’s Here! Celebrate with Faceted Summer Banner Vectors . Hy vọng hệ thống bài học này sẽ mang lại cho bạn những kiến thức hữu ích trong quá trình bạn học Adobe illustrator (Ai).
Chúc các bạn thành công!
Summer’s Here! Celebrate with Faceted Summer Banner Vectors
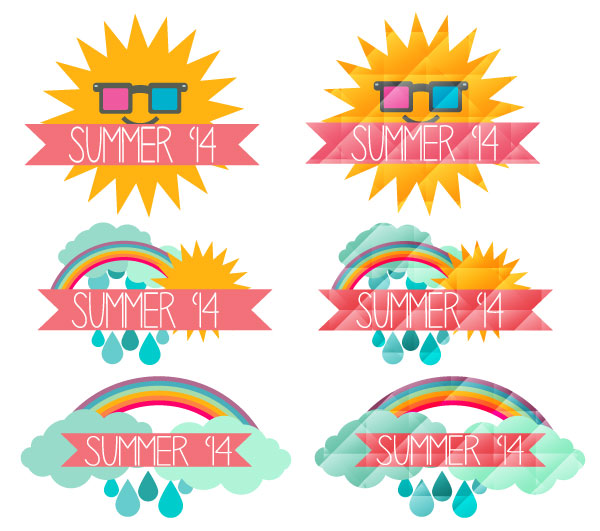
Final Image

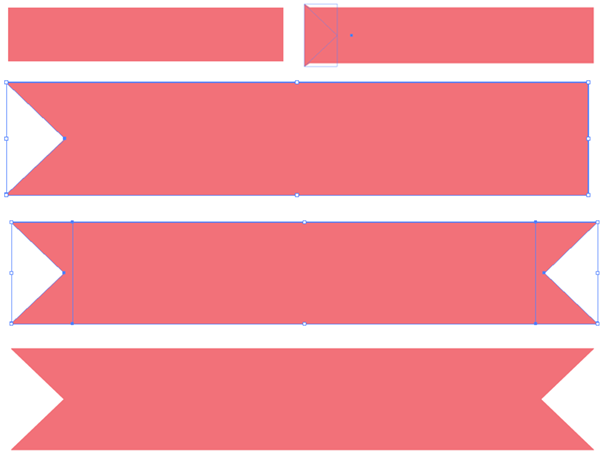
Each of the faceted summer banner designs begin with the same banner. Using the Rectangle Tool (M), draw a narrow, horizontal rectangle in light coral. Use the Pen Tool (P) or the Polygon Tool in order to draw a triangle that intersects with both corners on the left of the rectangle. Select both objects and hit Minus Front in the Pathfinder panel. Repeat on the other side in order to complete your ribbon banner.
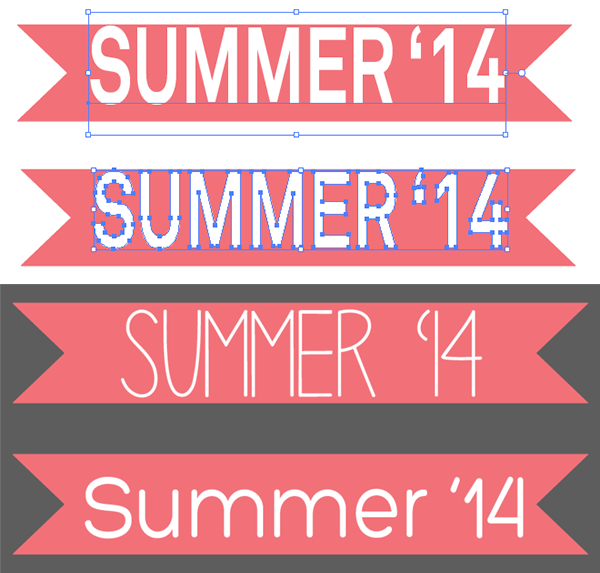
The text for these summer banner vectors is fairly simple: Summer ’14. I played with three sans-serif fonts: Akkurat Pro, Penelope Anne, and Hero. Whatever font you choose for your banner, do not forget to Expand your text under Object .
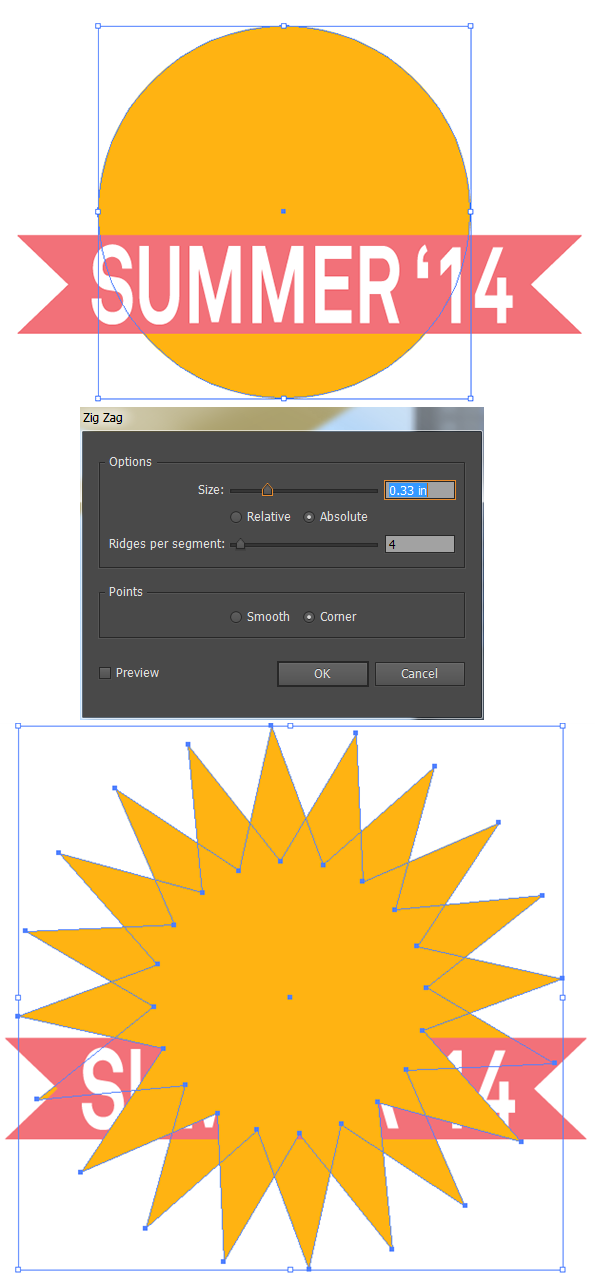
For the sun that appears in two of the summer banner vectors, start with a circle drawn with the Ellipse Tool (L) in a bright yellow. Under Effect > Distort & Transform > Zig Zag, enter 0.33in, or so, with 4 ridges per segment and hit OK. Expand under Object, and Copy (Control-C), Paste (Control-V), and Rotate the copied starburst on top of the first one so you have a bright, golden sun. Group(G) both shapes together and place beneath the banner ribbon in the Layers panel.
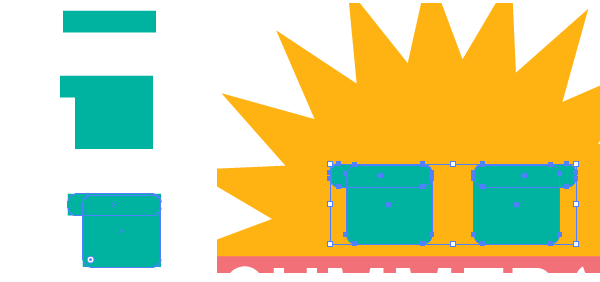
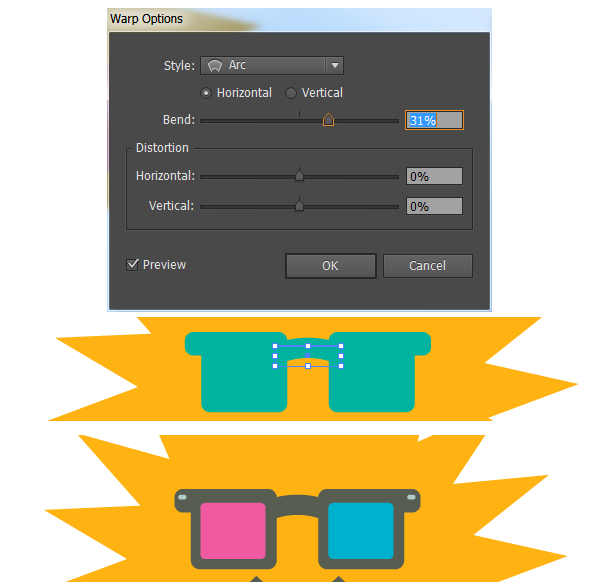
The sunglasses worn by the sun in the first summer banner vector are comprised of rounded rectangles. Draw a narrow, horizontal rectangle for the top of the glasses and a square for the first frame. Align these pieces to the right side (in the Align panel). Use the Direct Selection Tool (A) in order to select the rectangles that make up the left side of the glasses and pull the live corners inward so the rectangles are rounded. alternatively, if you’re not using Adobe Illustrator CC, you can use the Rounded Rectangle Tool from the start, but you will have to specify the corner radii. Repeat for the other side.
For the bridge of the glasses, draw a small rectangle between either frame of the glasses and go to Effect > Warp > Arc in order to Bend the rectangle 31% Horizontally. Expand your shape and recolor the glasses frames accordingly. I chose to place pink and blue rounded rectngles in the center of each frame for the lenses and two small gray rectangles on either side of the top of the frames as a Ray-Ban-esque detail. the first banner is complete. Let’s move on to the second and third.
I Copied and Pasted the sun, as well as the banner itself, for the second summer banner vector. The sun was scaled down and placed to the right. Using the Ellipse Tool to draw a series of circles, of various sizes, in order to form a cloud. when satisfied with the cloud design, Select all of the circles and Unite in Pathfinder.
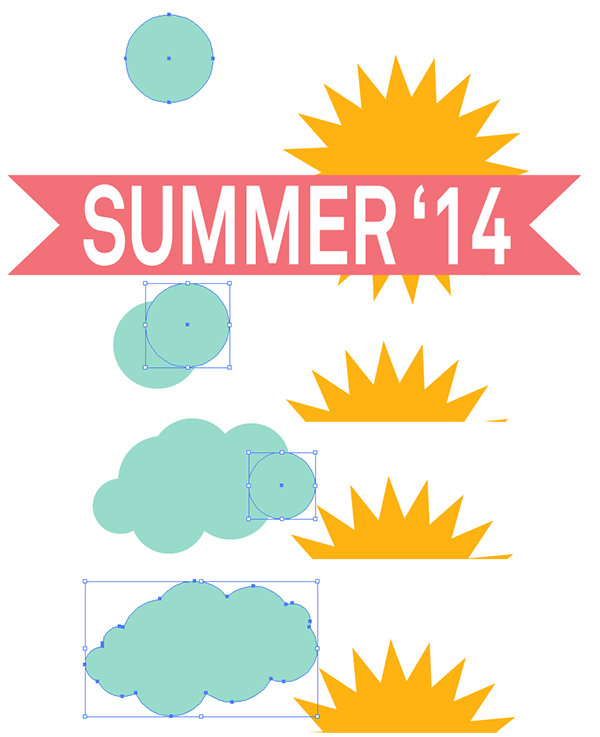
I’ve layered two clouds behind the sun, one darker than the other, in order to create some depth. Next up are raindrops. Draw a circle and pull the top anchorpoint upwards with the Direct Selection Tool. Use the Convert Anchor Point Tool (Shift-C) in order to change the top of the raindrop to a point. Copy, Paste, Scale, and scatter the raindrops around the composition, under the ribbon banner.

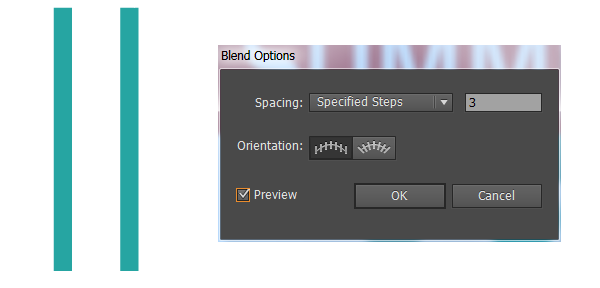
For the rainbow, which appears in two of the summer banner vectors, draw two identical, narrow, vertical rectangles. Select both and use the Blend Tool (W) to select both rectangles and apply a blend of 3 – 4 Steps.
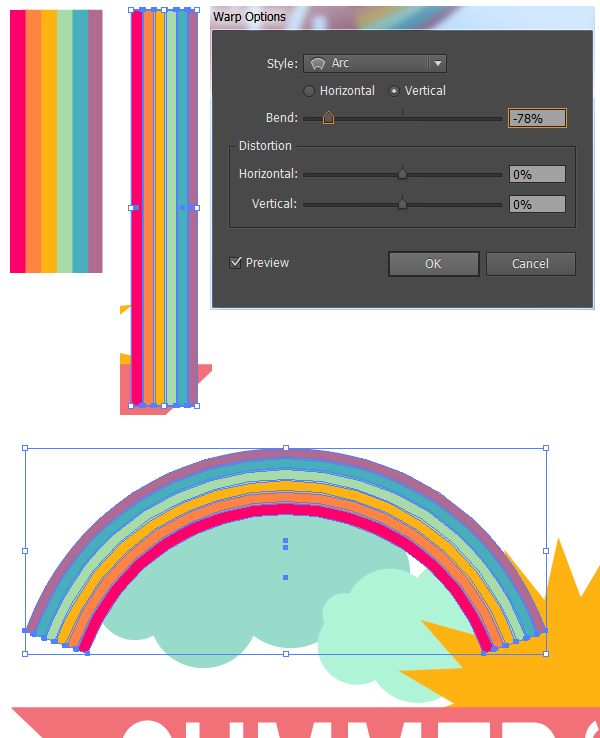
Expand the blend and change each rectangle’s color in order to create a rainbow. Group together the rectangles and pull them downward with theSelection tool in order to get a longer group of rainbow shapes. Go to Effect > Warp > Arc and set the Vertical Bend to -78%. This will result in a lovely, arching rainbow. Expand under Object.
For the third summer banner vector, use the rainbow, clouds, and raindrops from the second and place all of them behind the banner (as done with the other designs).

In order to create the faceted look seen on half of the summer banner vectors in the final product of this tutorial, use the Rectangular Grid Tool(found under the Line Tool (\) in the toolbar) to draw a square grid that’s six across and six down. Repeat the grid and rotate it so it overlaps the first grid on the diagonal.
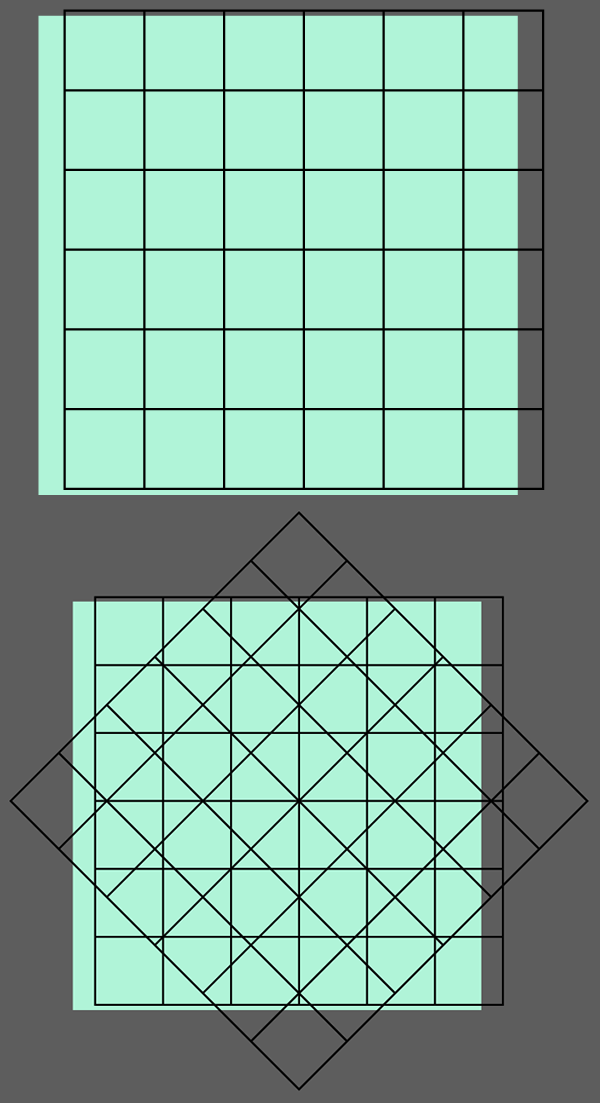
Select both grids and hit Divide in the Pathfinder panel. once divided, apply a Linear Gradient going from white to black in the Gradient panel. Adjust the gradient’s angle within the panel carefully, as the faceted look won’t happen if all of the pieces are going in the same dirction.
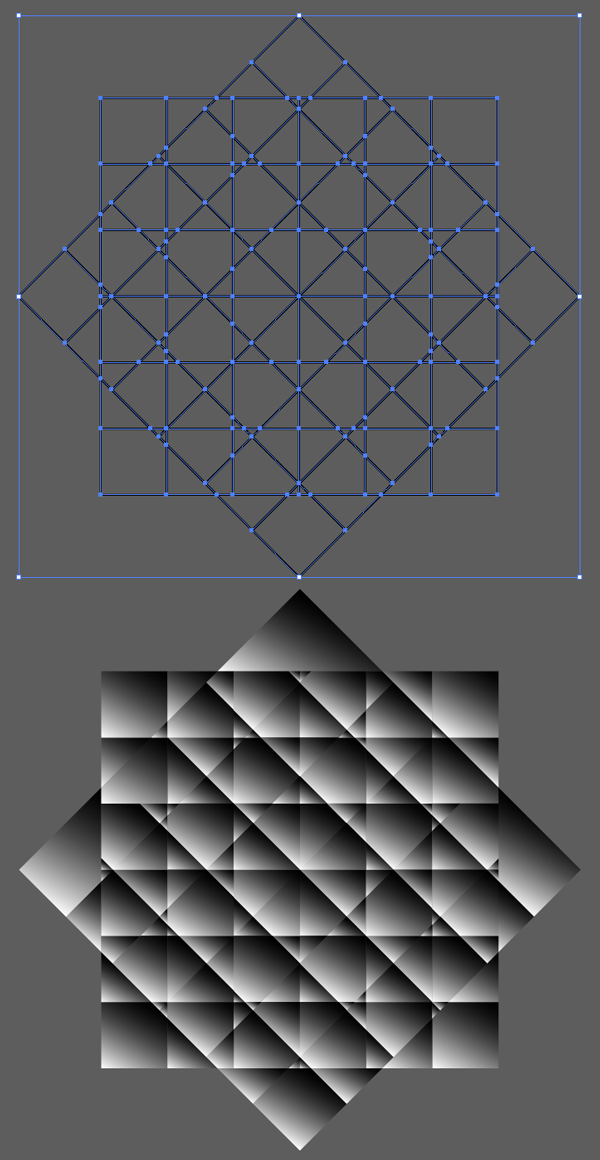
Copy and Paste one of your badge designs and Unite it in Pathfinder. Copy and Paste the gradient grid design from the last two steps and place it beneath the United banner design. Make sure the gradient grids are Grouped together. Select the united shape a the grid group and Make a Clipping Mask (Control-7). Align the newly clipped design over your original banner design and change the Clip Group’s Blend Mode to Overlay in the Transparency panel. Reduce the Clip Group’s Opacity within the Transparency panel as you see fit. Repeat this step on your other banner designs.
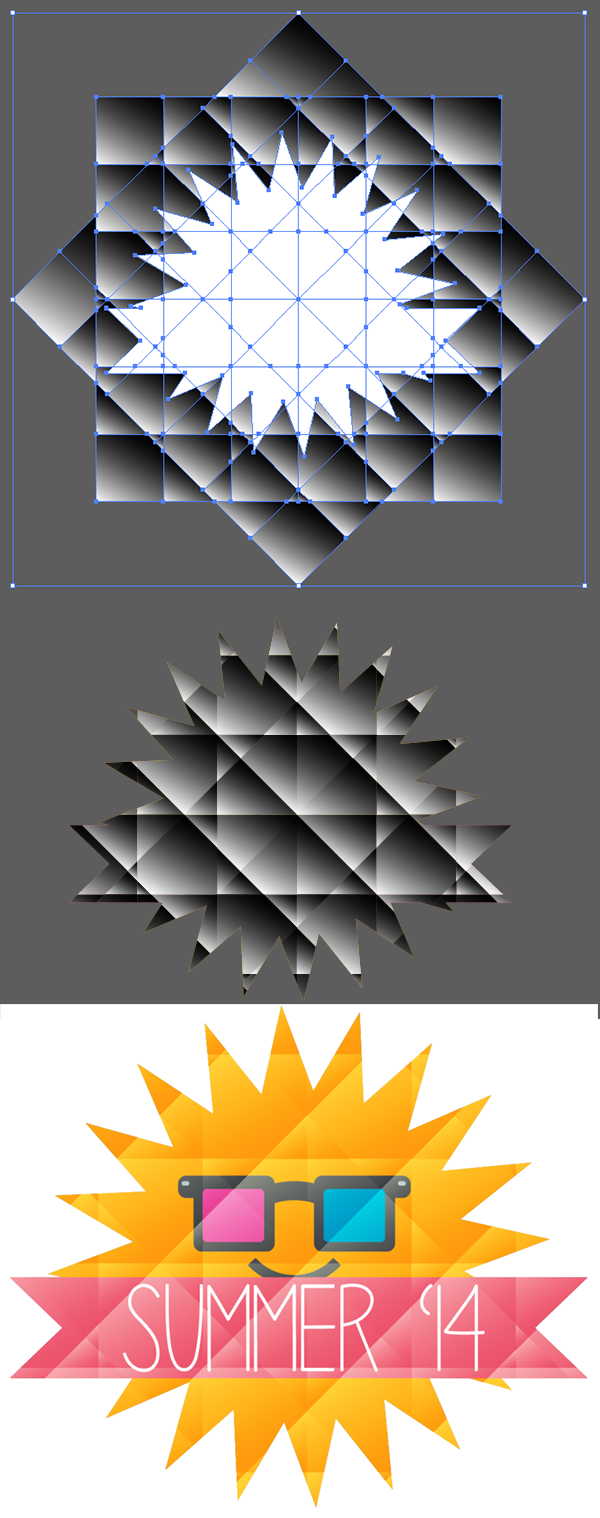
Now that you’ve created some banner designs, ready for summer, and learned an easy technique for creating facted designs, take this style into your work elsewhere creating sticker designs, t-shirt graphics, and stock artwork, all ready for your graphics portfolio.
Nếu bạn có nhu cầu học khóa học Adobe illustrator (Ai) vui lòng NHẤP VÀO ĐÂY để xem chi tiết về khóa học hoặc NHẤP VÀO ĐÂY để gửi thắc mắc về khóa học của bạn cho chúng tôi.
Những bài viết có nội dung liên quan khác:
Phím tắt trong phần mềm Illustrator (AI)
Giáo trình illustrator cs6 tiếng việt
Hệ thống bài học Adobe illustrator (Ai) (tiếng Việt) có hướng dẫn chi tiết - Bài 1
Hệ thống bài học Adobe illustrator (Ai) có hướng dẫn chi tiết - Bài 1 (Phiên bản gốc)
Hệ thống bài học Adobe illustrator (Ai) có hướng dẫn chi tiết - Bài 2 (Phiên bản gốc)
Hệ thống bài học Adobe illustrator (Ai) có hướng dẫn chi tiết - Bài 3 (Phiên bản gốc)
Hệ thống bài học Adobe illustrator (Ai) có hướng dẫn chi tiết - Bài 4 (Phiên bản gốc)
Trung tâm TIN HỌC KEY
ĐC : 203-205 Lê Trọng Tấn – Sơn Kỳ - Tân Phú – TPHCM
ĐT : (028) 22 152 521
Web : key.com.vn
Địa chỉ: 203 - 205 Lê Trọng Tấn, P. Sơn Kỳ, Q. Tân Phú, TP. HCM.
Điện thoại: (028) 22 152 521
Website: key.com.vn - Email: [email protected]
Địa chỉ: 765-767A (Số mới: 558-560A) Nguyễn Ảnh Thủ, P. Tân Chánh Hiệp, Q. 12, TP. HCM.
Điện thoại: (028) 2242 2244
Website: key.com.vn - Email: [email protected]