NHẤP VÀO ĐÂY để xem các bước trước đó .....
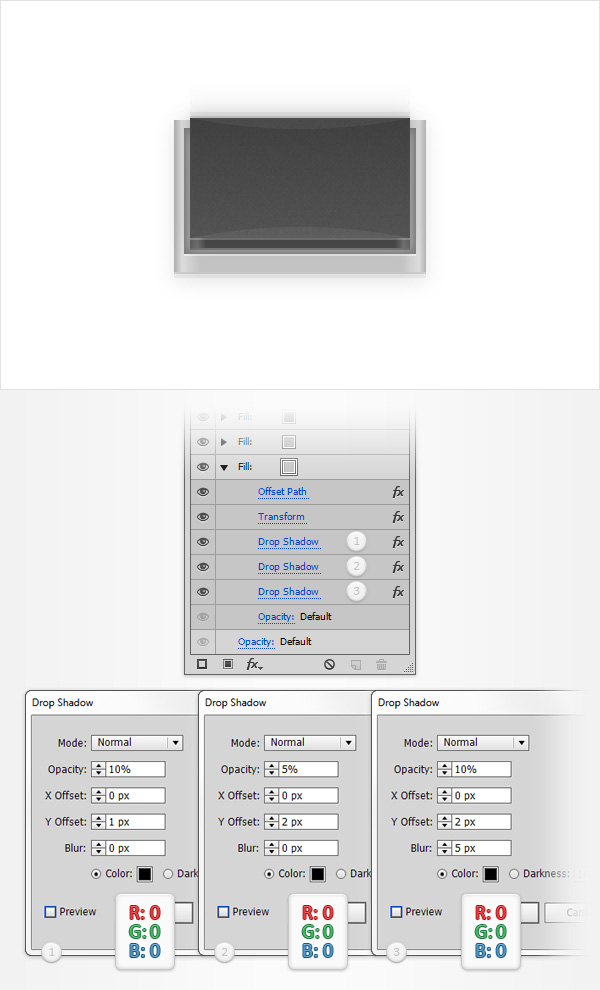
Step 11
Make sure that your rectangle is still selected, reselect the bottom fill and go to Effect > Stylize > Drop Shadow. Enter the properties shown in the left window (in the following image), click OK then add the other two Drop Shadow effects shown in the following image.
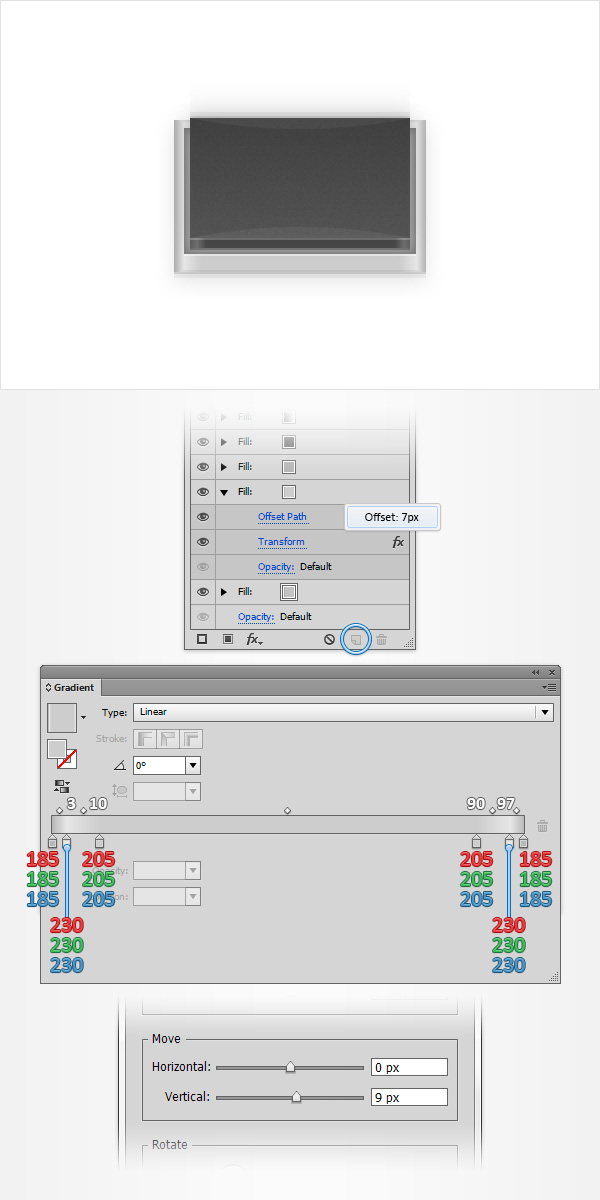
Step 12
Make sure that your rectangle is still selected, focus on the Appearance panel, select the bottom fill and simply duplicate it using the Duplicate Selected Item button (pointed by the blue circle in the following image). Select the newly created fill, replace the existing gradient with the one shown in the following image and go to Effect > Path > Offset Path. Enter a 7px Offset, click OK and go to Effect > Distort & Transform > Transform. Focus on the Move section, drag the Vertical slider at 9px and click OK.
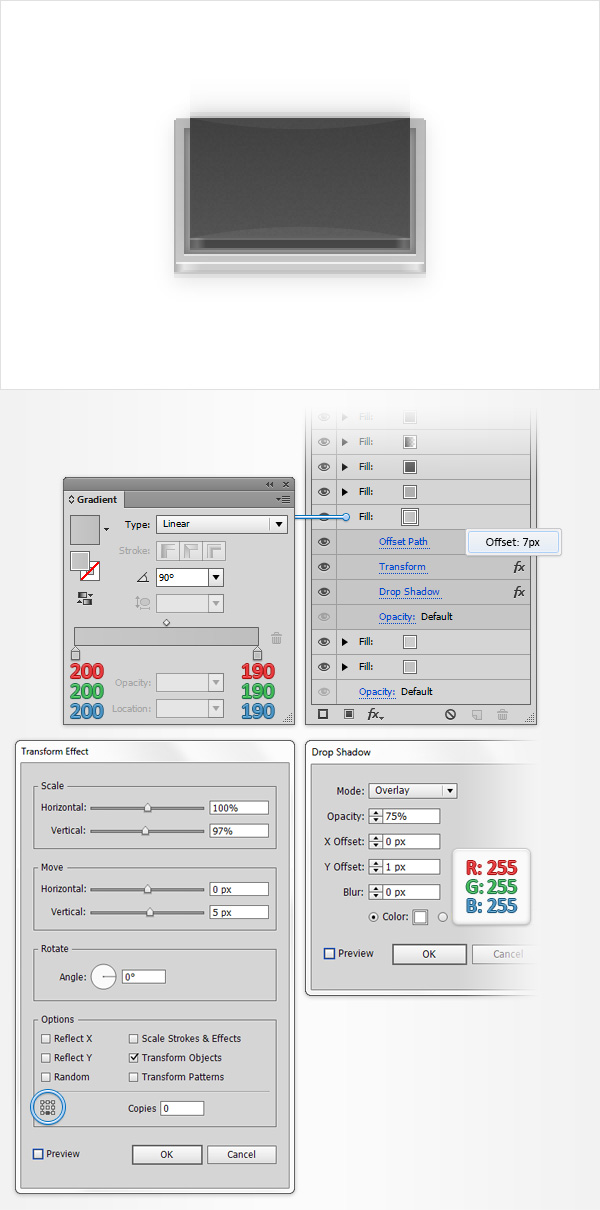
Step 13
Make sure that your rectangle is still selected, focus on the Appearance panel and add a new fill. Select this new fill and drag it right above the bottom, two fills. Make sure that it stays selected, add the linear gradient shown in the following image and go to Effect > Path > Offset Path. Enter a 7px Offset, click OK and go to Effect > Distort & Transform > Transform. Enter the properties shown in the following image (don’t forget to check the middle, bottom reference point), click OK and go to Effect > Stylize > Drop Shadow. Enter the attributes shown below and click OK.
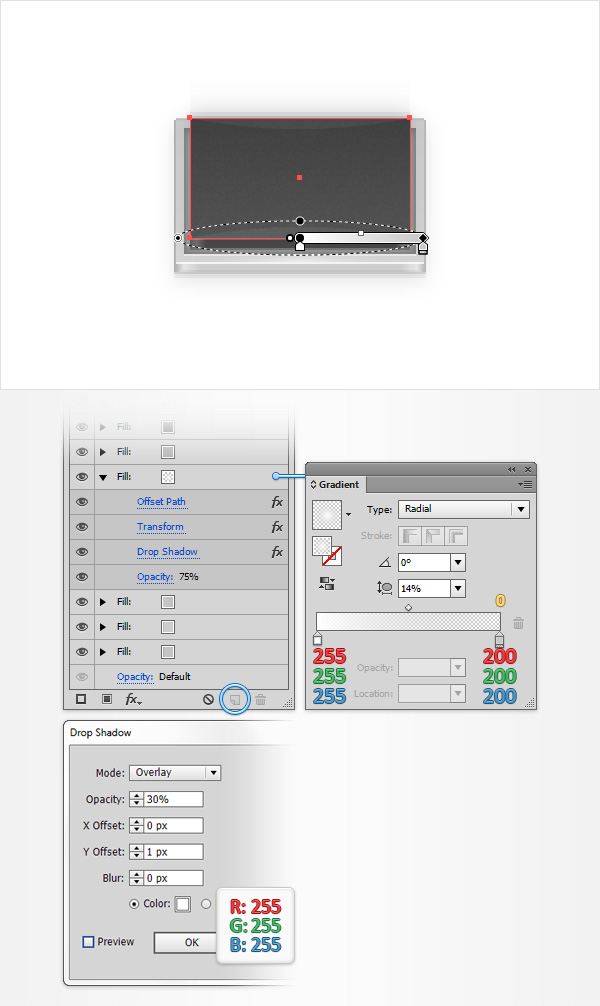
Step 14
Make sure that your rectangle is still selected, focus on the Appearance panel, select the fill added in the previous step and simply duplicate it using that same Duplicate Selected Item button. Select the newly created fill, add the radial gradient shown in the following image, lower itsOpacity to 75% and open the existing Drop Shadow effect. Simply replace those attributes with the ones shown in the following image.
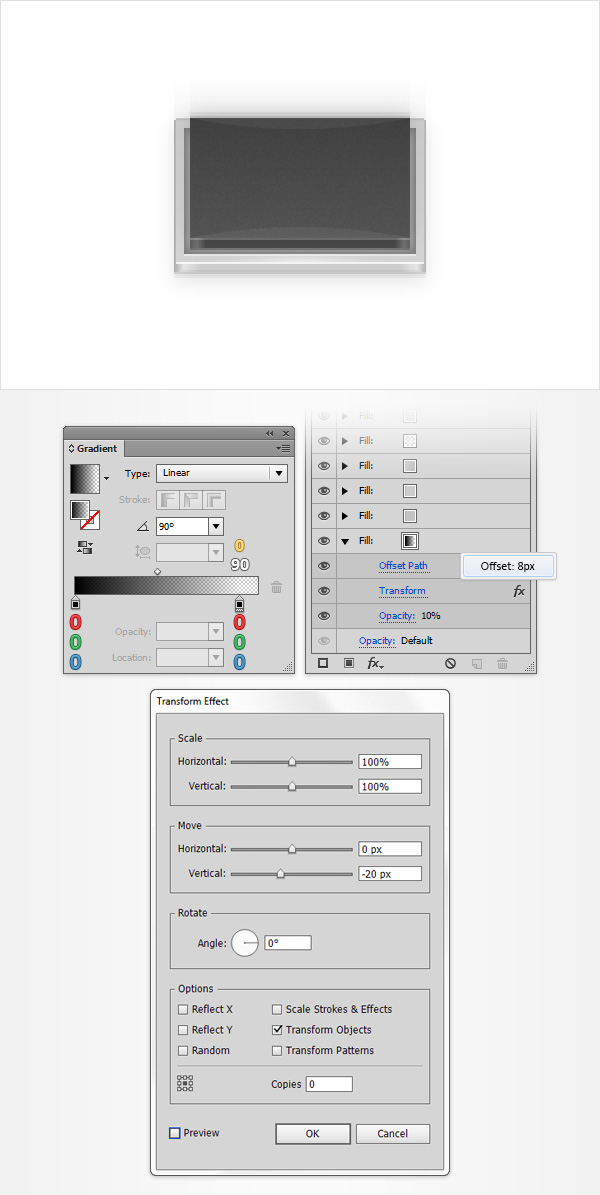
Step 15
Make sure that your rectangle is still selected, add a new fill and drag it in the bottom of the Appearance panel. Make sure that it stays selected, add the linear gradient shown in the following image, lower its Opacity to 10% and go to Effect > Path > Offset Path. Enter an 8px Offset, click OK and go to Effect > Distort & Transform > Transform. Enter the properties shown in the following image and click OK.
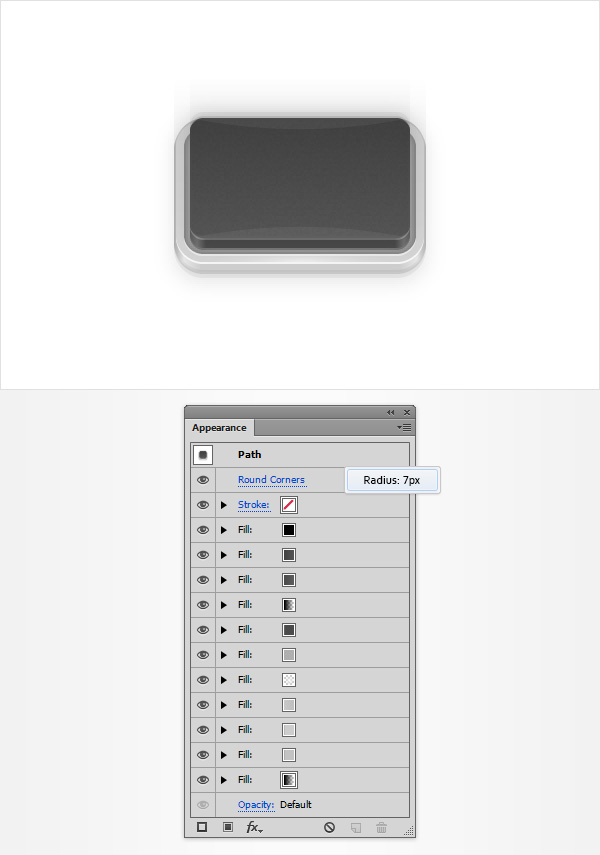
Step 16
Getting close to finishing this 3D button vector! Reselect your rectangle, focus on the Appearance panel, make sure that the entire path is selected (simply click on the “Path” piece of text from the top of the Appearance panel) and go to Effect > Stylize > Rounded Corners. Enter a 7px Radius and click OK. In the end things should look like in the following image.
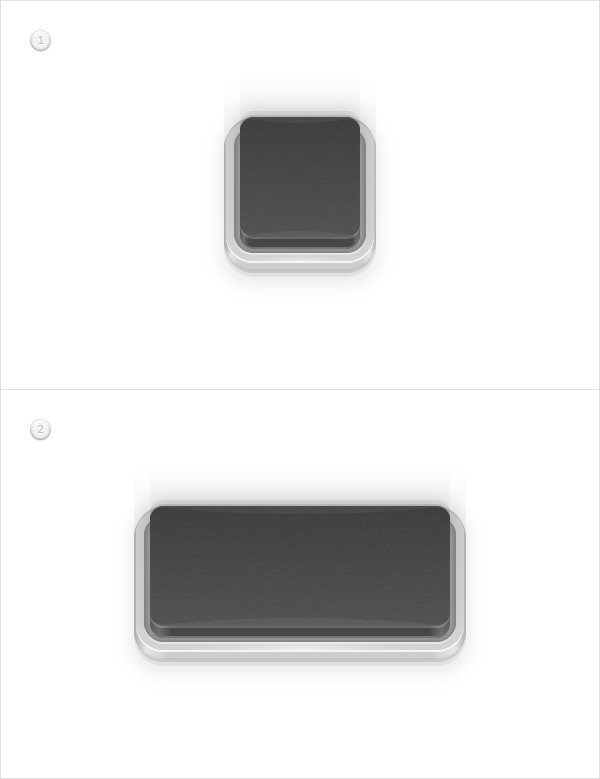
Step 17
Now that you made your 3D button vector you can easily resize it however you want.
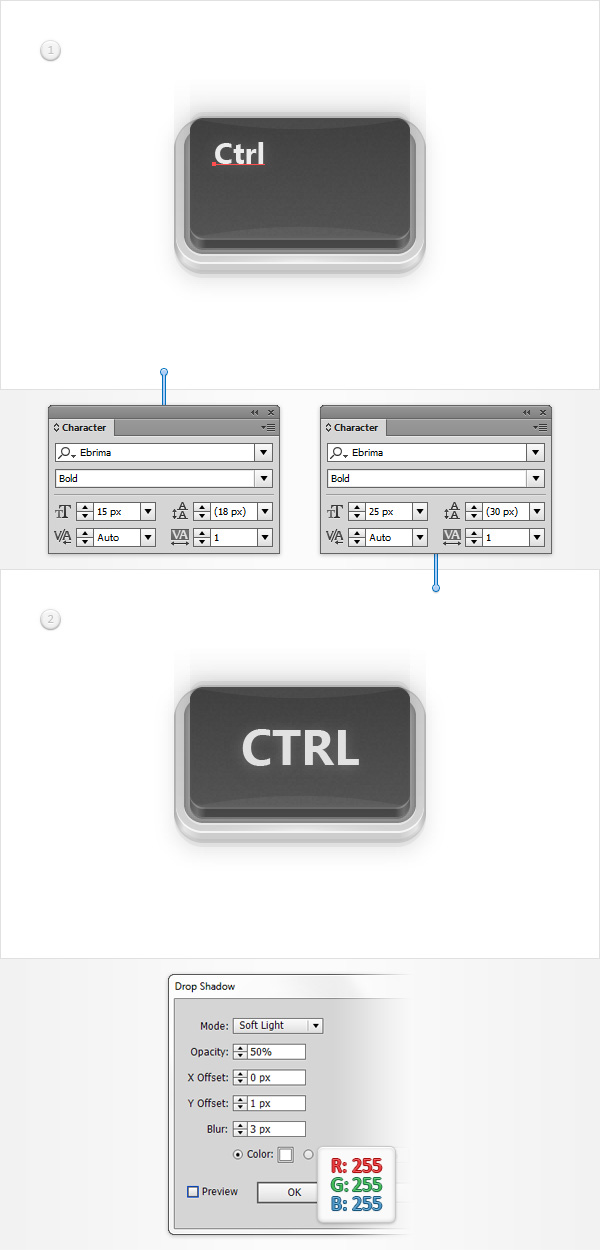
Step 18
Open the Character panel (Window > Type > Character), pick the Type Tool (T), simply click on the artboard and add your piece of text to your 3D button vector. Set the color at R=225 G=225 B=225 and use the font attributes show in the following image. Feel free to use other properties if you don’t like these. Make sure that your text is still selected and go to Effect > Stylize > Drop Shadow. Enter the properties shown in the following image and click OK.
Step 19
Finally, you can multiply and play a little with your 3D button vectors.
And We’re Done!
I hope you’ve enjoyed this tutorial and can apply these techniques in your future projects.

Nếu bạn có nhu cầu học khóa học Adobe illustrator (Ai) vui lòng NHẤP VÀO ĐÂY để xem chi tiết về khóa học hoặc NHẤP VÀO ĐÂY để gửi thắc mắc về khóa học của bạn cho chúng tôi.
Những bài viết có nội dung liên quan khác:
Phím tắt trong phần mềm Illustrator (AI)
Giáo trình illustrator cs6 tiếng việt
Hệ thống bài học Adobe illustrator (Ai) (tiếng Việt) có hướng dẫn chi tiết - Bài 1
Hệ thống bài học Adobe illustrator (Ai) có hướng dẫn chi tiết - Bài 1 (Phiên bản gốc)
Hệ thống bài học Adobe illustrator (Ai) có hướng dẫn chi tiết - Bài 2 (Phiên bản gốc)
Hệ thống bài học Adobe illustrator (Ai) có hướng dẫn chi tiết - Bài 3 (Phiên bản gốc)
Hệ thống bài học Adobe illustrator (Ai) có hướng dẫn chi tiết - Bài 4 (Phiên bản gốc)
Hệ thống bài học Adobe illustrator (Ai) có hướng dẫn chi tiết - Bài 5 (Phiên bản gốc)
Hệ thống bài học Adobe illustrator (Ai) có hướng dẫn chi tiết - Bài 6 (Phiên bản gốc) Phần 1
Hệ thống bài học Adobe illustrator (Ai) có hướng dẫn chi tiết - Bài 6 (Phiên bản gốc) Phần 2
Hệ thống bài học Adobe illustrator (Ai) có hướng dẫn chi tiết - Bài 7 (Phiên bản gốc)
Hệ thống bài học Adobe illustrator (Ai) có hướng dẫn chi tiết - Bài 8 (Phiên bản gốc)
Hệ thống bài học Adobe illustrator (Ai) có hướng dẫn chi tiết - Bài 10 (Phiên bản gốc) Phần 1
Hệ thống bài học Adobe illustrator (Ai) có hướng dẫn chi tiết - Bài 9 (Phiên bản gốc)
Trung tâm TIN HỌC KEY
ĐC : 203-205 Lê Trọng Tấn – Sơn Kỳ - Tân Phú – TPHCM
ĐT : (028) 22 152 521
Web : key.com.vn
Địa chỉ: 203 - 205 Lê Trọng Tấn, P. Sơn Kỳ, Q. Tân Phú, TP. HCM.
Điện thoại: (028) 22 152 521
Website: key.com.vn - Email: [email protected]
Địa chỉ: 765-767A (Số mới: 558-560A) Nguyễn Ảnh Thủ, P. Tân Chánh Hiệp, Q. 12, TP. HCM.
Điện thoại: (028) 2242 2244
Website: key.com.vn - Email: [email protected]